
Follow Me On Social Media!

The Best Hawaiian Butter Mochi Recipe: Chewy, Sweet, and Perfectly Golden.

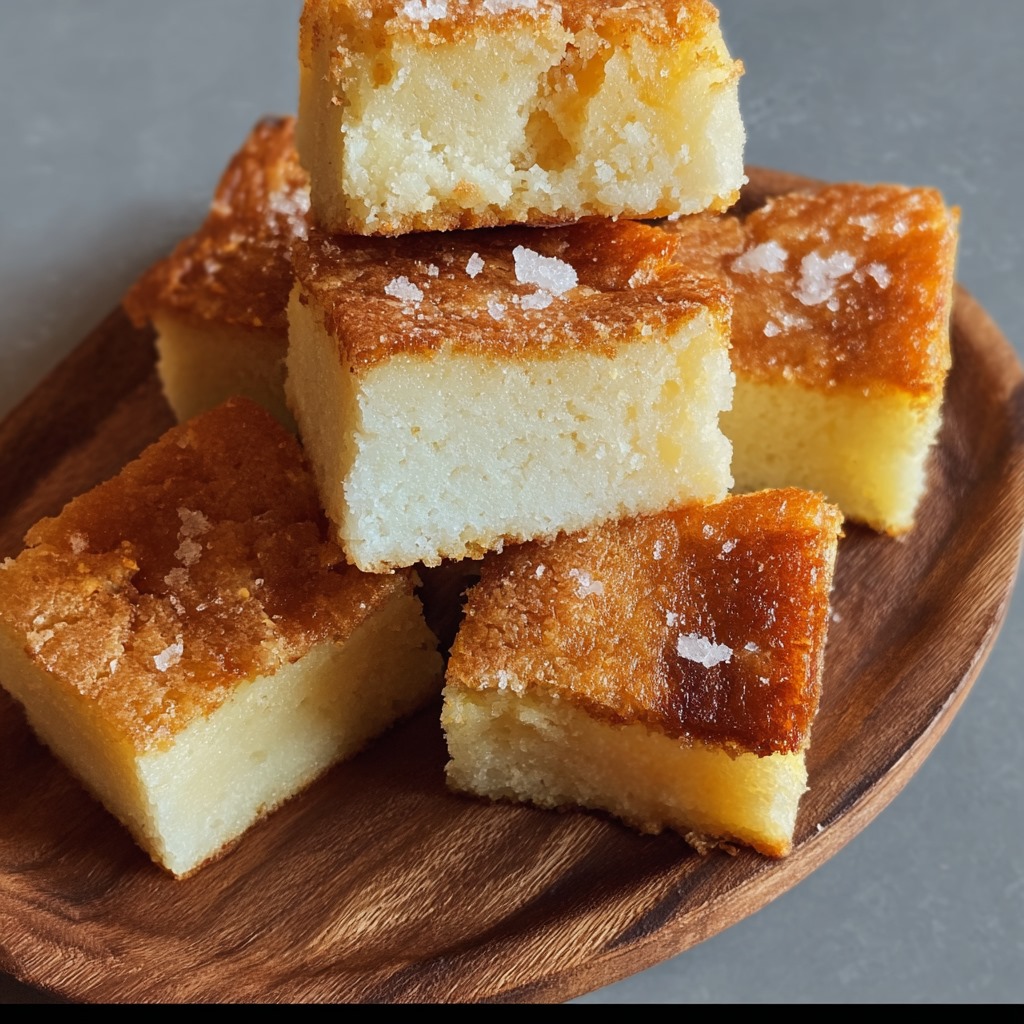
Growing up in a multicultural neighborhood, I discovered butter mochi at a local Hawaiian bakery, and it became one of those treats that just stuck with me. This isn’t your typical dessert—it’s something beautifully unique that sits perfectly between a cake and a confection. Butter mochi combines the chewy texture of traditional Japanese mochi with rich butter and coconut milk, creating something that’s both familiar and completely new.
What makes this Hawaiian butter mochi so special is its incredible texture. It’s dense yet tender, with a slightly sticky surface that gives way to a soft, almost custard-like center. The sweetness is gentle rather than overwhelming, and there’s this wonderful coconut undertone that makes each bite feel tropical and comforting at the same time.
This recipe has become my go-to when I want something different for potlucks or family gatherings. It’s surprisingly simple to make, requiring just one bowl and basic pantry ingredients, yet it always impresses people who haven’t tried it before. The best part? It actually gets better after sitting overnight, making it perfect for preparing ahead of special occasions.
Ingredients
Dry Ingredients:
- 1 pound (16 oz) mochiko (sweet rice flour)
- 2 cups granulated sugar
- 1 teaspoon baking powder
- 1/2 teaspoon salt
Wet Ingredients:
- 1 can (13.5 oz) full-fat coconut milk
- 1 can (12 oz) evaporated milk
- 1/2 cup (1 stick) unsalted butter, melted and slightly cooled
- 4 large eggs, room temperature
- 1 teaspoon vanilla extract
For the Pan:
- Butter or cooking spray for greasing
The key ingredient here is mochiko, which is sweet rice flour made from glutinous rice. You can find it in the Asian section of most grocery stores or online. Don’t substitute regular rice flour or all-purpose flour—mochiko is what gives butter mochi its signature chewy texture.
Instructions
Start by preheating your oven to 350°F (175°C). Grease a 9×13-inch baking dish thoroughly with butter or cooking spray. This step is crucial because butter mochi can stick stubbornly to the pan if not properly greased.
In a large mixing bowl, whisk together the mochiko, sugar, baking powder, and salt until well combined. Make sure there are no lumps in the mochiko—if you find any, press them out with the back of a spoon or sift the mixture.
In a separate bowl, combine the coconut milk, evaporated milk, melted butter, eggs, and vanilla extract. Whisk these wet ingredients until smooth and well blended. The mixture should be creamy and uniform in color.
Pour the wet ingredients into the dry ingredients and stir with a wooden spoon or rubber spatula until just combined. The batter will be quite thick and sticky—this is exactly what you want. Don’t overmix; stop as soon as you no longer see streaks of flour.
Pour the batter into your prepared baking dish and spread it evenly with a spatula. The surface doesn’t need to be perfectly smooth since it will level out during baking.
Bake for 60-70 minutes, until the top is golden brown and set. The center should still have a slight jiggle when you gently shake the pan, but it shouldn’t look wet or underbaked. A toothpick inserted in the center should come out with just a few moist crumbs.
Let the butter mochi cool completely in the pan before cutting. This is important—cutting it while warm will result in a gooey mess. Once cooled, use a sharp knife to cut into squares. The pieces will be slightly sticky, which is normal.
Flavor & Texture Notes
Butter mochi has a texture unlike anything else in Western baking. It’s pleasantly chewy without being tough, similar to the consistency of a dense custard or flan but with more bounce. The surface develops a slightly crispy skin during baking that contrasts beautifully with the tender interior.
The flavor is subtly sweet with a rich, buttery base enhanced by coconut milk’s natural creaminess. It’s not aggressively coconutty—instead, the coconut adds depth and a hint of tropical flavor that makes the sweetness more complex. The vanilla rounds everything out with a warm, familiar note.
Each bite has this wonderful way of sticking slightly to your teeth before releasing, and the flavor continues to develop as you chew. It’s comfort food in the truest sense—satisfying without being heavy, sweet without being cloying.
Tips & Variations
For a richer coconut flavor, replace the evaporated milk with a second can of coconut milk. This makes the texture slightly more dense but intensifies that tropical taste.
Some bakers add a few drops of food coloring to create pastel versions—pale pink or green are traditional choices that look beautiful at parties. Add the coloring to the wet ingredients before mixing.
If you can’t find mochiko locally, order it online rather than substituting. However, in a pinch, some Asian markets sell “glutinous rice flour” which is essentially the same thing under a different name.
For a less sweet version, reduce the sugar to 1.5 cups. The texture will be slightly less tender, but some people prefer this more balanced sweetness.
Try adding 1/2 cup of shredded coconut to the batter for extra texture and coconut flavor. Toast it lightly first for even more depth.
Purple sweet potato powder (about 2 tablespoons) creates a beautiful lavender color and adds subtle earthy notes that complement the coconut perfectly.
Storage & Make-Ahead
Store butter mochi covered at room temperature for up to 3 days. The texture actually improves after the first day as the flavors meld and the crumb becomes more tender.
For longer storage, wrap individual pieces in plastic wrap and refrigerate for up to one week. You can also freeze wrapped pieces for up to 3 months—just thaw at room temperature before serving.
This dessert is actually better when made ahead. I often prepare it the day before serving, as overnight resting allows the texture to settle into that perfect chewy consistency that makes butter mochi so special.
If you’re making it for a party, cut it into squares and store in a covered container. The pieces might stick together slightly, but they separate easily.
Serving Suggestions
Butter mochi is perfect on its own, but it pairs beautifully with fresh tropical fruits like mango, pineapple, or passion fruit. The acidity of the fruit cuts through the richness nicely.
Serve small squares alongside coffee or tea—the mild sweetness won’t compete with your drink. It’s also wonderful with vanilla ice cream for a more substantial dessert.
For special occasions, dust the tops with powdered sugar just before serving, or drizzle with a simple glaze made from powdered sugar and milk.
Cut into larger rectangles and serve as a coffee shop-style treat, or cut into small bite-sized pieces for parties where guests can easily grab them with their fingers.
FAQ
Can I use light coconut milk instead of full-fat? You can, but the texture won’t be as rich and creamy. Full-fat coconut milk contributes significantly to butter mochi’s characteristic dense, tender crumb. Light coconut milk will result in a slightly drier, less satisfying texture.
Why is my butter mochi too sticky to cut? This usually happens when it’s not completely cooled or when the pan wasn’t greased well enough. Make sure to cool it completely—at least 2 hours—and use a sharp knife wiped clean between cuts. A thin layer of cooking spray on your knife can also help.
Can I make this gluten-free? Butter mochi is naturally gluten-free since it’s made with mochiko (sweet rice flour) rather than wheat flour. Just make sure your baking powder doesn’t contain wheat-based ingredients—most brands are naturally gluten-free, but it’s worth checking the label.
My butter mochi turned out too dense. What went wrong? This often happens when the mochiko is packed too tightly when measuring, or when the batter is overmixed. Spoon the mochiko lightly into your measuring cup and level it off, don’t pack it down. Mix the batter just until combined—overmixing develops the starches too much.
Can I double this recipe? Absolutely, but you’ll need to use a larger pan or two 9×13 dishes. A half-sheet pan works well for a double batch. The baking time might increase by 10-15 minutes, so keep an eye on it and look for that golden-brown top as your indicator of doneness.
There’s something deeply satisfying about making butter mochi from scratch. It connects you to Hawaiian tradition while being accessible enough for any home kitchen. The simple ingredient list masks the complexity of flavors and textures you’ll achieve, and once you taste that first perfectly chewy, subtly sweet bite, you’ll understand why this humble dessert has such a devoted following. Give it a try—your kitchen will smell amazing, and you’ll have discovered a new favorite treat that’s sure to become a regular in your baking rotation.