
Follow Me On Social Media!

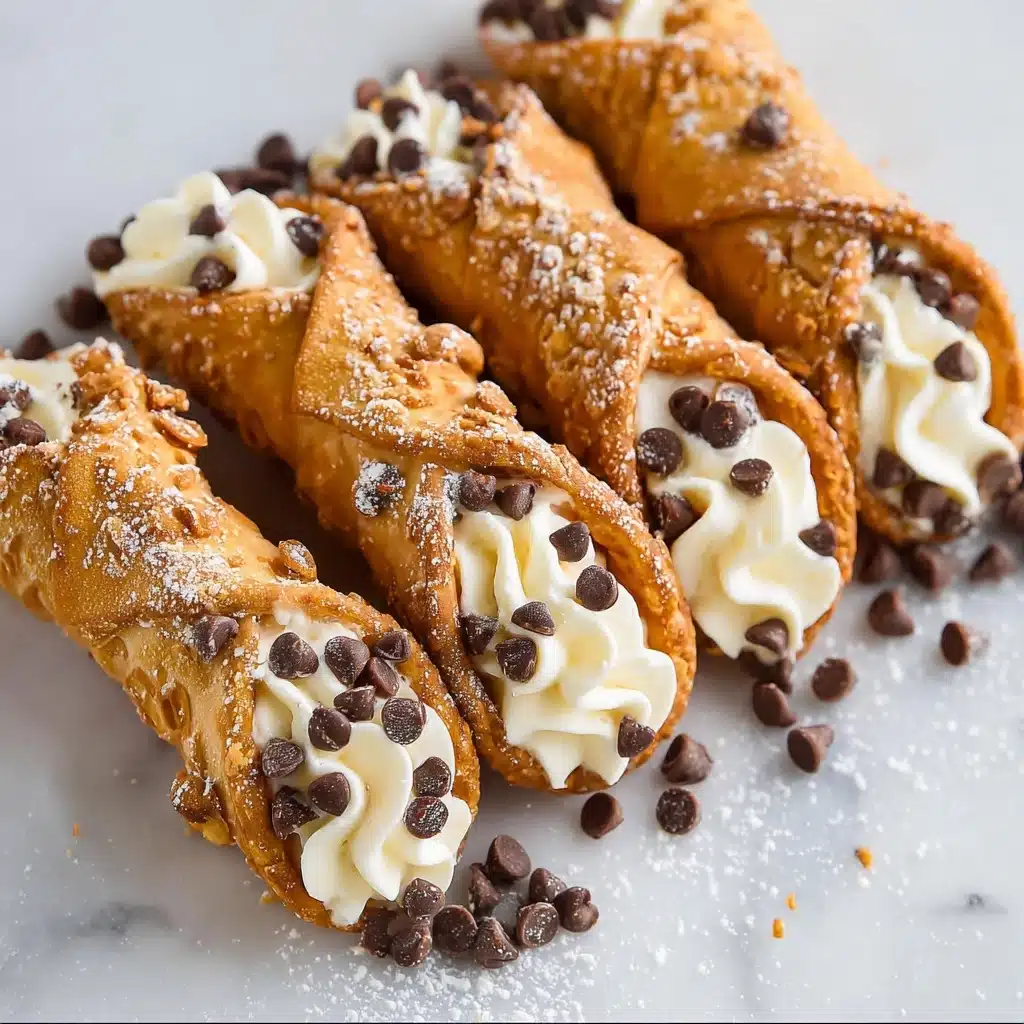
Pizzelle Cannoli with Ricotta: A Crispy Twist on the Classic Italian Dessert.
When I first discovered that you could transform pizzelle into cannoli shells, it felt like finding a secret passage in my grandmother’s recipe box. Growing up in an Italian-American household, both pizzelle and cannoli were staples at every family gathering, but somehow it never occurred to me that these two beloved treats could become one magnificent dessert.
The traditional cannoli shell requires deep frying and special metal forms, which can intimidate even experienced home bakers. But pizzelle cannoli offers an elegant solution – these delicate, lace-like waffle cookies become naturally crispy shells when shaped while still warm. The result is a lighter, more refined version of the classic cannoli that showcases the beautiful pattern of the pizzelle iron while holding all that creamy ricotta filling we crave.
This recipe combines the best of both worlds: the aromatic, vanilla-scented crispness of fresh pizzelle with the rich, slightly sweet ricotta filling that makes cannoli so irresistible. What makes this approach particularly special is how the pizzelle’s subtle flavor complements rather than competes with the ricotta, creating a harmonious dessert that feels both familiar and wonderfully new.
Ingredients
For the Pizzelle Shells:
- 3 large eggs, room temperature
- 3/4 cup granulated sugar
- 1/2 cup unsalted butter, melted and cooled slightly
- 1 3/4 cups all-purpose flour
- 2 teaspoons baking powder
- 1/4 teaspoon salt
- 2 teaspoons pure vanilla extract
- 1 teaspoon anise extract (optional, but traditional)
For the Ricotta Filling:
- 2 cups whole milk ricotta cheese, drained
- 1 cup powdered sugar, sifted
- 1/2 teaspoon vanilla extract
- 1/4 teaspoon orange zest
- 1/4 cup mini chocolate chips
- 2 tablespoons chopped pistachios
- 1 tablespoon candied orange peel, finely chopped (optional)
For Assembly:
- Additional powdered sugar for dusting
- Extra mini chocolate chips for garnish
- Chopped pistachios for garnish
Instructions
Start by preparing your ricotta filling, as it needs time to chill and develop flavors. Place the ricotta in a fine-mesh strainer lined with cheesecloth or paper towels, and let it drain in the refrigerator for at least 2 hours. This step removes excess moisture that could make your filling runny.
While the ricotta drains, make the pizzelle batter. In a large bowl, whisk the eggs and granulated sugar until the mixture is pale and slightly thick, about 3 minutes of vigorous whisking. The sugar should be mostly dissolved. Slowly pour in the melted butter while continuing to whisk, ensuring the mixture stays smooth.
In a separate bowl, combine the flour, baking powder, and salt. Gradually add the dry ingredients to the egg mixture, stirring until just combined. The batter should be smooth but not overmixed. Stir in the vanilla extract and anise extract if using. The batter will be thicker than pancake batter but thinner than cookie dough.
Preheat your pizzelle iron according to the manufacturer’s instructions. Most irons need about 5 minutes to reach the proper temperature. When ready, drop about 1 tablespoon of batter onto the center of each pizzelle form. Close the iron and cook for 30-45 seconds, or until the pizzelle are golden brown and crispy.
Here’s where timing becomes crucial: remove each pizzelle with a thin spatula and immediately wrap it around a cannoli form or a wooden dowel about 1 inch in diameter. Hold the seam closed for about 10 seconds until the pizzelle cools and holds its shape. If you don’t have cannoli forms, you can use the handle of a wooden spoon, though the tubes will be smaller.
Work quickly, as pizzelle become difficult to shape once they cool. If a pizzelle does harden before you can shape it, return it to the warm iron for just a few seconds to soften. Continue until all batter is used, which should yield about 20-24 shells.
For the filling, combine the drained ricotta with the sifted powdered sugar in a mixing bowl. Beat with an electric mixer on medium speed until smooth and fluffy, about 2 minutes. Add the vanilla extract and orange zest, mixing until incorporated. Gently fold in the mini chocolate chips, chopped pistachios, and candied orange peel if using.
Transfer the filling to a pastry bag fitted with a large round tip, or use a zip-top bag with one corner snipped off. This makes filling the shells much easier and cleaner than using a spoon.
Flavor & Texture Notes
The finished pizzelle cannoli delivers a symphony of textures and flavors that feels both nostalgic and fresh. The shells maintain that characteristic pizzelle crispness – light and delicate with a subtle crunch that gives way easily to reveal the creamy interior. The anise extract adds a gentle licorice note that’s traditional in pizzelle, though you can omit it if the flavor isn’t to your taste.
The ricotta filling provides a cool, smooth contrast to the crispy shell. When properly drained, the ricotta becomes dense and almost cheesecake-like in texture, while the powdered sugar adds sweetness without overwhelming richness. The orange zest brightens the entire dessert with a subtle citrus note that cuts through the richness beautifully.
The mini chocolate chips add pleasant little bursts of sweetness and texture, while the pistachios contribute a gentle nuttiness and attractive green color. Each bite combines all these elements into something that tastes unmistakably Italian but with a lighter, more elegant feel than traditional fried cannoli shells.
Tips & Variations
The key to perfect pizzelle cannoli lies in timing and temperature control. Keep your pizzelle iron consistently hot, and work quickly when shaping the shells. If you’re making these for a party, consider enlisting a helper – one person can work the iron while another shapes the shells.
For chocolate lovers, try adding 2 tablespoons of cocoa powder to the pizzelle batter, reducing the flour by the same amount. This creates beautiful dark shells that pair wonderfully with the white ricotta filling. You can also dip the ends of filled cannoli in melted chocolate and chopped nuts for an extra special presentation.
The filling is endlessly adaptable. Try adding a tablespoon of your favorite liqueur – amaretto, rum, or Grand Marnier all work beautifully. For a lighter version, substitute part of the ricotta with mascarpone cheese. Some bakers like to add a pinch of cinnamon to the filling, which complements the anise in the shells perfectly.
If you don’t have a pizzelle iron, you can make thin crepes and shape them while warm, though the texture will be different. The iron’s distinctive pattern is part of what makes these so special, so it’s worth investing in one if you plan to make pizzelle regularly.
For gluten-free versions, substitute the all-purpose flour with a high-quality gluten-free baking blend that contains xanthan gum. The texture will be slightly different but still quite good.
Storage & Make-Ahead
Unfilled pizzelle shells can be stored in an airtight container for up to one week at room temperature. Make sure they’re completely cool before storing, and place parchment paper between layers to prevent sticking. The shells actually improve slightly after a day, as any residual moisture evaporates and they become perfectly crisp.
The ricotta filling can be prepared up to two days in advance and stored covered in the refrigerator. In fact, allowing the filling to rest overnight helps the flavors meld and develop. Give it a gentle stir before using, as some separation may occur.
However, once you fill the shells, these cannoli are best enjoyed within 2-3 hours. The moisture from the ricotta will gradually soften the crispy shells, so timing is important for the best texture contrast. If you must store filled cannoli, place them in a single layer in the refrigerator, but expect some softening of the shells.
For entertaining, prepare the components separately and assemble just before serving. This approach gives you the best of both worlds – advance preparation with optimal texture when served.
Serving Suggestions
These pizzelle cannoli make an elegant ending to an Italian dinner, particularly when served alongside espresso or a sweet dessert wine like Moscato d’Asti. The light, crispy texture makes them perfect after a heavier meal, as they satisfy the desire for something sweet without being overly rich.
For special occasions, arrange them on a marble or glass serving platter, dusted lightly with powdered sugar and garnished with a few fresh berries. The contrast of colors is beautiful, and berries add a fresh element that complements the rich ricotta.
Consider serving them as part of an Italian dessert table alongside biscotti, gelato, and fresh fruit. They also pair beautifully with a cheese course, as the sweet ricotta filling bridges the gap between savory and sweet courses.
For a modern presentation, serve them standing upright in small glasses or cups, which showcases their elegant shape and makes them easy for guests to grab. A light dusting of cocoa powder or cinnamon adds visual appeal and hints at the flavors within.
FAQ
Can I make pizzelle cannoli without anise extract? Absolutely. While anise is traditional in pizzelle, you can omit it entirely or substitute with almond extract, lemon zest, or even a small amount of rum extract. The shells will still be delicious and crispy.
What if I don’t have cannoli forms for shaping? Use wooden spoon handles, dowels, or even clean markers wrapped in foil. The diameter should be about 1 inch. You can also purchase inexpensive metal cannoli forms online, which are reusable and make the process easier.
Why is my ricotta filling too runny? This usually happens when the ricotta hasn’t been drained long enough or thoroughly enough. Always drain ricotta for at least 2 hours, and if it’s still too wet, place it in a cheesecloth-lined strainer overnight in the refrigerator.
Can I freeze pizzelle shells? Yes, unfilled shells freeze beautifully for up to 3 months. Place them in a single layer on a baking sheet to freeze solid, then transfer to airtight containers with parchment between layers. Thaw at room temperature for about 15 minutes before filling.
How do I know when the pizzelle are done cooking? They should be golden brown and stop steaming when you lift the iron lid. Underdone pizzelle will be too soft to shape, while overdone ones become too brittle and may crack when rolled. It takes a few tries to get the timing perfect with your specific iron.
Creating these pizzelle cannoli bridges the gap between tradition and innovation, giving you a dessert that honors Italian heritage while offering something uniquely your own. The process might seem involved at first, but once you get into the rhythm of making and shaping the shells, it becomes quite meditative. There’s something deeply satisfying about transforming simple batter into these elegant, edible containers for creamy ricotta goodness.
Whether you’re making them for a special celebration or simply because you want to try something new in the kitchen, these pizzelle cannoli will reward your efforts with a dessert that’s both impressive and genuinely delicious. The combination of textures and flavors creates something memorable – the kind of treat that has people asking for the recipe and talking about it long after the last bite.