
Follow Me On Social Media!

Keto Chicken Parmesan: The Low-Carb Version That Actually Tastes Like the Real Thing.
I’ll be honest—when I first went low-carb, chicken parmesan was one of those dishes I thought I’d have to give up forever. The crispy breaded coating, the melted cheese, the tangy marinara—it all seemed impossible without carbs. But after months of experimenting in my kitchen, I figured out how to make keto chicken parmesan that’s just as satisfying as the traditional version, maybe even better.
This recipe uses a combination of almond flour and parmesan cheese to create a coating that gets genuinely crispy in the pan. No soggy, sad cutlets here. The trick is getting the ratio right and knowing when to stop touching the chicken so it can develop that golden crust. I’ve made this for friends who aren’t even watching their carbs, and they’ve gone back for seconds without realizing it’s low-carb. That’s the kind of recipe worth keeping around.
What makes this keto chicken parmesan work so well is that it doesn’t try to be something it’s not. Instead of mimicking breadcrumbs with weird substitutes that never quite get there, it embraces what almond flour and cheese can do naturally. The result is a dish that stands on its own, with a nutty, savory coating that complements the chicken instead of just covering it up. Whether you’re committed to keto or just trying to cut back on carbs, this is one of those recipes that’ll become a regular in your dinner rotation.
Ingredients
For the chicken:
- 2 large boneless, skinless chicken breasts (about 1.5 pounds total)
- 1 cup almond flour
- 1 cup grated parmesan cheese, divided
- 1 teaspoon garlic powder
- 1 teaspoon Italian seasoning
- 1/2 teaspoon salt
- 1/4 teaspoon black pepper
- 1/4 teaspoon paprika
- 2 large eggs
- 2 tablespoons heavy cream
- 3 tablespoons olive oil (for frying)
For assembly:
- 1 cup sugar-free marinara sauce (check labels—aim for 4g net carbs or less per serving)
- 1 1/2 cups shredded mozzarella cheese
- Fresh basil leaves for garnish
- 2 tablespoons grated parmesan cheese (for topping)
Instructions
Start by preparing your chicken breasts. Place them on a cutting board and slice each one horizontally to create thinner cutlets. You want them about 1/2 inch thick—this helps them cook evenly and gives you more surface area for that crispy coating. If the pieces are uneven, place them between two sheets of plastic wrap and gently pound them with a meat mallet or the bottom of a heavy pan until they’re uniform in thickness.
Set up your breading station with three shallow dishes. In the first dish, whisk together the eggs and heavy cream until smooth. In the second dish, combine the almond flour, half a cup of the grated parmesan, garlic powder, Italian seasoning, salt, pepper, and paprika. Mix it well with a fork so everything is evenly distributed. Keep the third dish empty for now—you’ll use it to hold the breaded chicken before cooking.
Pat the chicken cutlets completely dry with paper towels. This step matters more than you might think. Any moisture on the surface will prevent the coating from sticking properly and make it harder to get that crispy exterior you’re after. Season both sides of each cutlet lightly with a pinch of salt.
Dip one chicken cutlet into the egg mixture, making sure both sides are coated. Let the excess drip off for a second, then press it into the almond flour mixture. Really press it in there—use your hands to pat the coating onto the chicken so it adheres well. Flip it over and repeat on the other side. Place the breaded cutlet in your empty dish and repeat with the remaining chicken.
Heat the olive oil in a large skillet over medium heat. You want the oil hot enough that it sizzles when you add the chicken, but not so hot that it smokes. Test it by dropping a tiny pinch of the almond flour mixture into the pan—if it sizzles immediately, you’re ready to go.
Carefully place the breaded chicken cutlets in the hot oil, working in batches if necessary to avoid crowding the pan. This is important: once you put the chicken in the pan, leave it alone. Don’t move it, don’t flip it, don’t peek underneath for at least four minutes. Moving it too early will cause the coating to stick to the pan instead of staying on the chicken. After four to five minutes, the bottom should be deep golden brown and crispy. Flip the cutlets and cook for another four to five minutes on the other side.
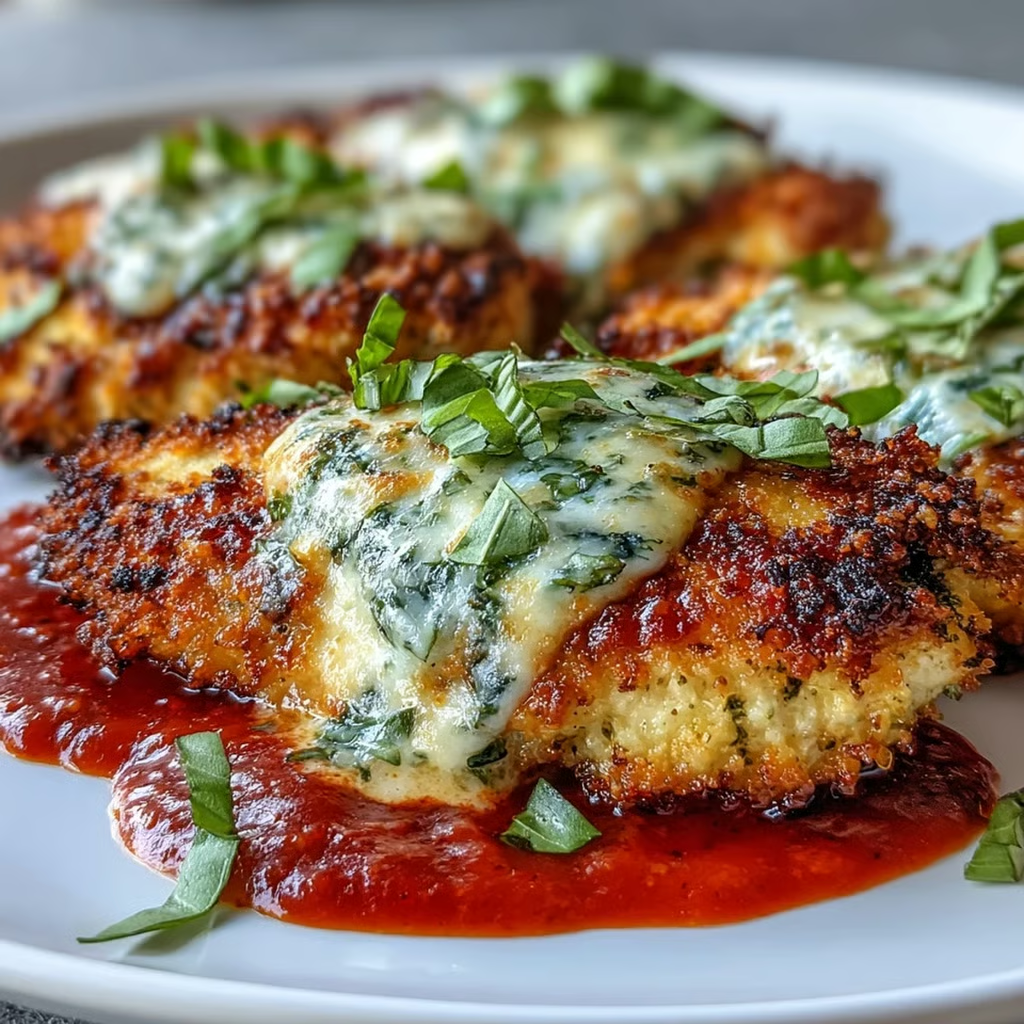
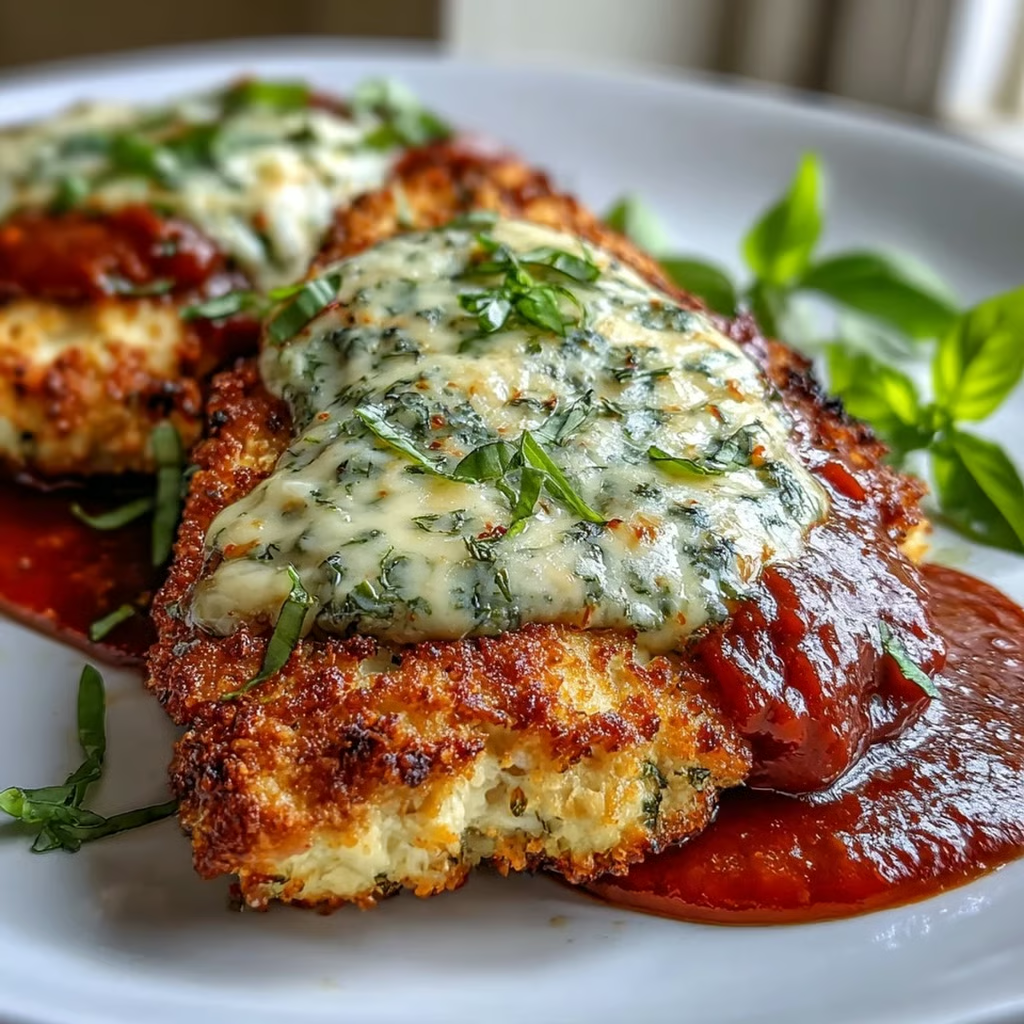
While the second side is cooking, preheat your oven to 400°F (200°C). Once both sides of the chicken are golden and crispy, transfer the cutlets to a baking dish. Spoon the marinara sauce over each piece—you don’t need to cover them completely, just a nice layer across the top. Sprinkle the shredded mozzarella over the sauce, then finish with the remaining grated parmesan.
Bake for 8 to 10 minutes, until the cheese is melted and starting to bubble. If you want the cheese on top to get a little browned and crispy around the edges, turn on the broiler for the last minute or two. Just watch it closely so it doesn’t burn. Remove from the oven, let it rest for a couple of minutes, then garnish with fresh basil leaves torn into pieces.
Flavor & Texture Notes
The coating on this keto chicken parmesan has a texture that’s closer to a thin, crispy crust than traditional thick breading, but that works in its favor. It’s nutty from the almond flour with a sharp, salty bite from the parmesan that makes each bite interesting. The chicken stays juicy inside while the outside gets genuinely crunchy—not just crisp, but crunchy enough that you hear it when you cut into it.
The marinara sauce adds acidity and sweetness that cuts through the richness of the cheese and the fried coating. Make sure you’re using a good quality sugar-free marinara because it makes a difference. Some of the low-carb versions taste flat or overly salty, so it’s worth reading labels or making your own if you have the time. The melted mozzarella brings that familiar comfort food quality, stretchy and mild, while the extra parmesan on top adds little crispy spots where it hits the hot sauce.
The fresh basil at the end isn’t just for looks. It adds a bright, slightly peppery note that keeps the dish from feeling too heavy. Even though this is fried chicken covered in cheese, the combination of flavors feels balanced rather than overwhelming.
Tips & Variations
If you can’t find almond flour or prefer not to use it, you can substitute with crushed pork rinds for an even crispier coating. Just pulse them in a food processor until they’re fine, almost like breadcrumb texture. The flavor will be a bit more savory and less nutty, but it works really well.
For a dairy-free version, this gets tricky since parmesan and mozzarella are pretty central to the dish. You could try using nutritional yeast in the coating instead of parmesan and skip the cheese topping, but I’ll be straight with you—it won’t be chicken parmesan anymore. It’ll be good, just different.
Some people like to add a pinch of red pepper flakes to the almond flour mixture for a little heat. I’ve also stirred some dried oregano into the marinara sauce for extra Italian flavor. If you have leftover pesto, a small dollop on top of the melted cheese before serving adds another layer of flavor that’s really nice.
You can use chicken thighs instead of breasts if you prefer dark meat. They’ll be a bit richer and stay even juicier, though they may take an extra minute or two to cook through. Just make sure the internal temperature reaches 165°F.
For meal prep, you can bread the chicken cutlets in advance and keep them in the fridge for up to 24 hours before cooking. Place parchment paper between each piece so they don’t stick together. This makes it easy to pull off a quick weeknight dinner.
Storage & Make-Ahead
Leftovers will keep in an airtight container in the refrigerator for up to three days. The coating won’t be as crispy when you reheat it, but it’s still tasty. To reheat, I recommend using the oven at 350°F for about 10 minutes rather than the microwave, which will make everything soggy. You can also reheat it in an air fryer at 350°F for 5 to 7 minutes if you have one—that’ll bring back some of the crispiness.
If you want to freeze this, do it before the baking step. Bread and fry the chicken, let it cool completely, then wrap each piece individually in plastic wrap and store in a freezer bag for up to two months. When you’re ready to eat, thaw overnight in the fridge, add the sauce and cheese, and bake as directed. The coating holds up surprisingly well.
Serving Suggestions
This keto chicken parmesan pairs really well with zucchini noodles tossed in a little olive oil and garlic. The lightness of the zoodles balances out the richness of the chicken without adding many carbs. If you’re not strictly keto, it’s also great with spaghetti squash or even a simple side salad with a vinaigrette.
Roasted vegetables like broccoli, asparagus, or green beans make excellent sides too. I usually toss them with olive oil, salt, and pepper and roast them at the same temperature while the chicken is baking with the cheese on top. Everything finishes at the same time, which makes serving easy.
For a lower-carb take on garlic bread, you can make some using the fathead dough method (mozzarella and almond flour dough) or just do what I do and butter some sliced mozzarella and broil it with garlic powder and Italian seasoning until it’s bubbly.
If you’re feeding a crowd, you can make this in a larger batch and serve it family-style in a big baking dish. Just arrange all the fried cutlets in the dish, top with sauce and cheese, and bake. It looks impressive and makes serving simple.
FAQ
Can I bake this instead of frying it? Yes, but the coating won’t get as crispy. Place the breaded chicken on a wire rack set over a baking sheet, spray lightly with cooking oil, and bake at 400°F for about 20 minutes, flipping halfway through. Then add the sauce and cheese and continue with the recipe. It’s a lighter option, just different in texture.
What if I don’t have sugar-free marinara? You can make a quick low-carb version by simmering a can of crushed tomatoes with olive oil, minced garlic, dried basil, oregano, salt, and pepper for 15 minutes. It won’t be quite as thick as jarred sauce, but it works in a pinch and you control exactly what goes in it.
How do I know when the chicken is fully cooked? Use an instant-read thermometer inserted into the thickest part of the cutlet. It should read 165°F. If you don’t have a thermometer, cut into the thickest part—the meat should be white all the way through with no pink, and the juices should run clear.
Can I use pre-shredded cheese? You can, but freshly grated parmesan and shredded mozzarella from a block will melt better and have better flavor. Pre-shredded cheese often contains anti-caking agents that can make it melt unevenly and give it a slightly grainy texture.
What’s the carb count per serving? This will vary depending on your exact ingredients, but typically each serving has around 6-8 net carbs, most of which come from the marinara sauce and the almond flour coating. If you use a very low-carb marinara and keep portions reasonable, you can get it even lower.
Conclusion
Making keto chicken parmesan at home is easier than you might think, and the results are so much better than anything you’d get from a restaurant trying to do a low-carb version. This isn’t a compromise or a sad substitute—it’s genuinely good food that happens to fit into a low-carb lifestyle. The crispy coating, the melted cheese, the tangy sauce—it all works together the way it should.
The beauty of this recipe is that once you get the technique down, you can play around with it. Try different cheeses, experiment with the spices in the coating, or change up the sauce. It’s flexible enough to become whatever you need it to be for dinner. Give it a try this week. I think you’ll be surprised at how satisfying it is, and how little you miss the traditional breaded version.