
Follow Me On Social Media!

Instant Pot Stuffed Peppers: The 30-Minute Method That Makes Classic Comfort Food Fast.
I’ll never forget the first time I made traditional stuffed peppers—standing over the stove for what felt like hours, waiting for the rice to cook, the peppers to soften, and everything to come together. It was delicious, but it was also a commitment. Then I discovered how perfectly the Instant Pot transforms this classic comfort food into a weeknight-friendly meal that’s ready in 30 minutes without sacrificing any of the flavors I loved.
The magic of pressure cooking stuffed peppers lies in how evenly and quickly everything cooks together. The peppers become perfectly tender without falling apart, while the filling stays moist and flavorful. No more worrying about undercooked rice or overcooked peppers—the Instant Pot handles the timing for you, creating consistently perfect results every time.
What makes these Instant Pot stuffed peppers special is how the pressure cooking intensifies all the flavors. The beef and rice filling becomes incredibly savory, infused with herbs and spices, while the peppers themselves contribute their own sweet flavor to the mix. The melted cheese on top creates that golden, bubbly finish that makes this dish feel like a warm hug on a plate.
This recipe solves the classic stuffed pepper dilemma: how to get everything cooked just right at the same time. The pressure cooker eliminates the guesswork and reduces the active cooking time dramatically, making this hearty, satisfying meal accessible any day of the week.
Ingredients
For the Stuffed Peppers:
- 6 large bell peppers (red, yellow, or orange work best)
- 1 pound ground beef (80/20 blend)
- 1 cup long-grain white rice, uncooked
- 1 medium onion, finely diced
- 2 cloves garlic, minced
- 1 can (14.5 ounces) diced tomatoes, drained (reserve juice)
- 1 cup beef broth
- 1 teaspoon Italian seasoning
- 1 teaspoon paprika
- 1/2 teaspoon salt
- 1/4 teaspoon black pepper
- 1 cup shredded cheddar cheese, divided
- 2 tablespoons olive oil
For the Cooking Liquid:
- 1 cup water
- Reserved tomato juice from canned tomatoes
- 1/2 teaspoon salt
For Serving:
- Fresh parsley for garnish
- Sour cream (optional)
- Additional shredded cheese
Instructions
Begin by preparing your peppers, which requires a bit of technique to get them ready for stuffing. Cut the tops off each bell pepper about 1/2 inch from the top, and carefully remove the seeds and white membranes from inside. If your peppers won’t stand upright, you can trim a very small slice from the bottom to create a flat base, being careful not to cut through to the interior. Set the prepared peppers aside while you make the filling.
Turn your Instant Pot to sauté mode and heat the olive oil. Add the diced onion and cook for about 3 minutes until it starts to soften and become fragrant. This step builds the flavor foundation for your filling. Add the minced garlic and cook for another 30 seconds, stirring constantly to prevent burning.
Add the ground beef to the pot, breaking it up with a wooden spoon as it cooks. Continue cooking for about 5-6 minutes until the beef is mostly browned but doesn’t need to be completely cooked through—it will finish cooking under pressure. The key is to break up any large chunks so the filling has a nice, even texture.
Stir in the uncooked rice, drained diced tomatoes, beef broth, Italian seasoning, paprika, salt, and pepper. Mix everything well to combine, then add half of the shredded cheese and stir until it’s incorporated into the mixture. The filling should look moist but not soupy—the rice will absorb the liquid during pressure cooking.
Cancel the sauté function and remove the inner pot carefully—it will be hot. Spoon the beef and rice mixture evenly into each prepared bell pepper, filling them about 3/4 full. Don’t pack the filling too tightly, as the rice will expand during cooking and you want room for that expansion.
Pour the cup of water and reserved tomato juice into the bottom of the Instant Pot, then add the 1/2 teaspoon of salt to the liquid. This creates the steam needed for pressure cooking while adding extra flavor. Place the trivet or steamer basket in the pot, then carefully arrange the stuffed peppers on top. They should fit snugly but not be crammed together.
Secure the Instant Pot lid and make sure the pressure valve is set to sealing. Select manual or pressure cook mode and set the timer for 15 minutes at high pressure. The pot will take about 10 minutes to come to pressure, then cook for 15 minutes, followed by a natural pressure release for 10 minutes. After 10 minutes, carefully quick-release any remaining pressure.
While the pressure releases, the peppers are essentially finishing their cooking in the residual heat. When you remove the lid, the peppers should be tender and the filling should be fully cooked with the rice nicely expanded and the beef thoroughly done.
Carefully remove each stuffed pepper using tongs or a large spoon—they’ll be very hot and the peppers will be tender, so handle them gently. Top each pepper with the remaining shredded cheese and let it melt from the residual heat, or place them under the broiler for 2-3 minutes for a golden, bubbly cheese top.
Flavor & Texture Notes
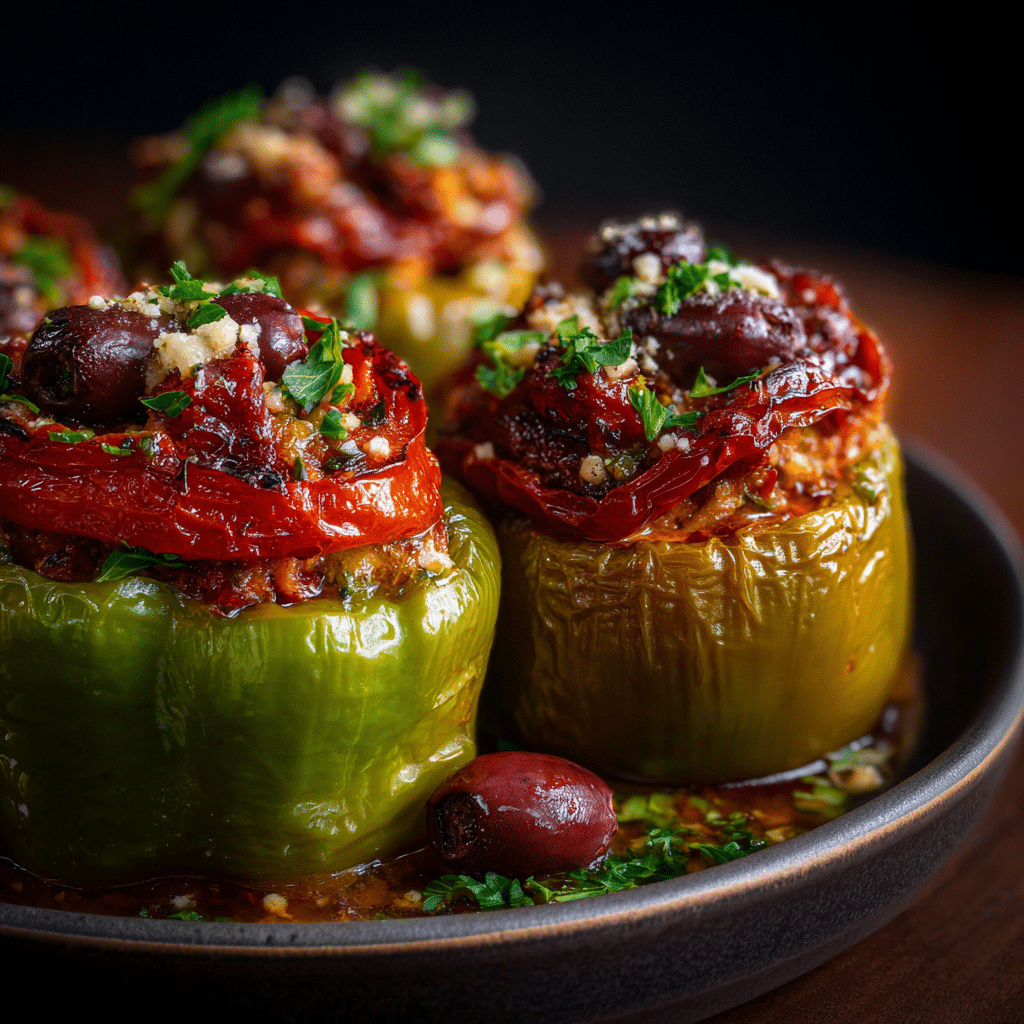
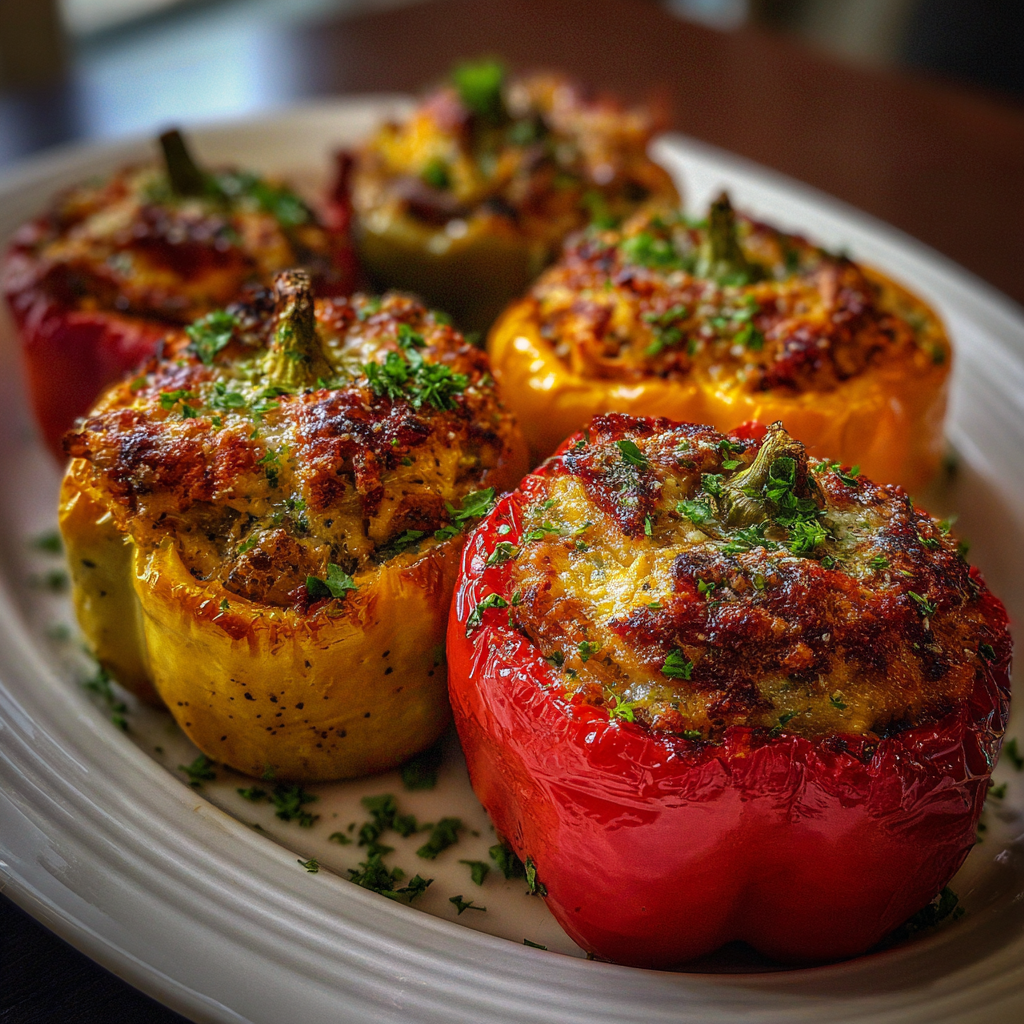
These Instant Pot stuffed peppers deliver all the comfort food satisfaction you expect with some delightful textural contrasts. The bell peppers become perfectly tender—soft enough to cut easily with a fork but still holding their shape beautifully. They retain just enough structure to serve as an elegant vessel while contributing their own sweet, slightly smoky flavor to the overall dish.
The filling achieves that ideal stuffed pepper consistency where every grain of rice is separate and fluffy, having absorbed all the savory beef broth and tomato flavors. The ground beef stays moist and flavorful, never dry or crumbly, while the diced tomatoes add little pockets of bright acidity that balance the richness of the meat and cheese.
The melted cheese creates a creamy element that binds everything together, while the Italian seasoning and paprika add warmth and depth without overwhelming the natural flavors of the peppers and beef. Each bite offers a satisfying combination of textures—the tender pepper walls, the fluffy rice, the savory beef, and the creamy melted cheese.
The cooking liquid at the bottom of the pot becomes infused with all these flavors, creating an aromatic steam that enhances every component. This isn’t just efficient cooking—it’s flavor-building that makes every element taste better than it would on its own.
Tips & Variations
Pepper Selection: Choose peppers that are roughly the same size so they cook evenly. Red, yellow, and orange peppers tend to be sweeter and more tender than green peppers, but any color works well. If you can only find green peppers, they’ll have a slightly more assertive, less sweet flavor that some people prefer.
Rice Alternatives: Long-grain white rice works best because it cooks evenly in the 15-minute timeframe. Brown rice would need a longer cooking time and more liquid. For a different texture, try wild rice blend, but increase the cooking time to 20 minutes and add an extra 1/4 cup of broth.
Meat Variations: Ground turkey, ground pork, or a mixture of beef and pork all work beautifully. For a leaner option, use 93/7 ground beef, but add an extra tablespoon of olive oil to prevent dryness. Italian sausage (with casings removed) creates a more complex flavor profile.
Vegetarian Version: Replace the ground meat with a mixture of cooked lentils, mushrooms, and extra vegetables like diced zucchini or corn. Use vegetable broth instead of beef broth and add an extra 1/2 cup of cheese for protein and richness.
Cheese Options: While cheddar is classic, mozzarella creates a lovely stretchy texture, and Monterey Jack adds mild creaminess. For more complexity, try a mixture of sharp cheddar and Parmesan, or use pepper jack for a spicy kick.
Spice Level: Add diced jalapeños to the filling for heat, or use hot Italian sausage instead of ground beef. A pinch of cayenne pepper in the rice mixture adds warmth without overwhelming the dish.
Storage & Make-Ahead
These stuffed peppers are excellent for meal prep and actually improve in flavor after a day in the refrigerator as all the seasonings meld together. Store cooked peppers in the refrigerator for up to 4 days in airtight containers. They reheat beautifully in the microwave for 2-3 minutes or in a 350°F oven for about 15 minutes.
For make-ahead convenience, you can stuff the peppers completely up to 24 hours before cooking. Store them covered in the refrigerator, then add about 2 minutes to the pressure cooking time to account for the cold start. The filling can also be made a day ahead and stored separately, then stuffed into peppers just before cooking.
These peppers freeze well after cooking, though the texture of the peppers will be slightly softer after thawing. Freeze in individual portions for up to 3 months. Thaw overnight in the refrigerator, then reheat in the oven or microwave. Add a sprinkle of fresh cheese before reheating for the best results.
For freezing uncooked stuffed peppers, wrap each one individually in plastic wrap, then place in freezer bags. They can go straight from freezer to Instant Pot—just add 5 minutes to the cooking time and ensure they’re completely heated through before serving.
Serving Suggestions
These stuffed peppers are substantial enough to serve as a complete meal, especially when paired with a simple side salad or steamed vegetables. A crisp green salad with vinaigrette provides a nice acidic contrast to the rich, cheesy peppers. Roasted Brussels sprouts or green beans complement the comfort food nature of the dish.
For a heartier meal, serve alongside garlic bread or dinner rolls to soak up any extra cheese or cooking juices. Mashed potatoes or rice pilaf can turn this into a truly filling feast, though the peppers are quite satisfying on their own.
The peppers look beautiful when served individually on plates, garnished with fresh chopped parsley and perhaps a dollop of sour cream on the side. For family-style serving, arrange them on a large platter and provide serving spoons so everyone can help themselves.
Consider offering hot sauce or additional cheese at the table for those who want to customize their peppers. A glass of medium-bodied red wine pairs beautifully with the savory, herb-infused flavors.
FAQ
Can I use different colored peppers in the same batch? Absolutely! Mixing colors makes for a beautiful presentation. All bell pepper varieties have similar cooking times, so they’ll cook evenly together. Red, yellow, and orange peppers tend to be sweeter, while green peppers have a more pronounced pepper flavor.
My peppers fell over during cooking. How can I prevent this? Choose peppers that sit upright naturally, and trim just a tiny bit off the bottom if needed to create a flat base. Don’t cut too much or you’ll create a hole. You can also nestle the peppers against each other in the Instant Pot so they support one another during cooking.
The rice in my filling was still a bit firm. What went wrong? This usually happens when there wasn’t enough liquid in the filling mixture or if the peppers weren’t sealed properly during pressure cooking. Make sure the mixture looks moist before stuffing, and ensure your pressure valve is set to sealing. If this happens, you can always cook for an additional 2-3 minutes under pressure.
Can I make these without the trivet or steamer basket? While the trivet keeps the peppers elevated above the cooking liquid for the best results, you can cook them directly in the liquid if necessary. Add an extra 1/2 cup of water to ensure there’s enough liquid for pressure building, and expect the bottom of the peppers to be slightly more tender.
How do I know when the peppers are done? Properly cooked peppers will be tender enough to pierce easily with a fork but still hold their shape. The filling should be hot throughout, and the rice should be fluffy and fully cooked. If you’re unsure, you can always cook for an additional 2-3 minutes under pressure.
The beauty of Instant Pot stuffed peppers lies in their perfect balance of convenience and comfort. This recipe transforms what used to be a special occasion dish into something you can make any night of the week without sacrificing the flavors that made you fall in love with stuffed peppers in the first place. The pressure cooker doesn’t just save time—it actually intensifies the flavors and ensures perfect results every single time. Once you try this method, you’ll wonder why you ever made stuffed peppers any other way.