
Follow Me On Social Media!

Chocolate Croissant Loaf.
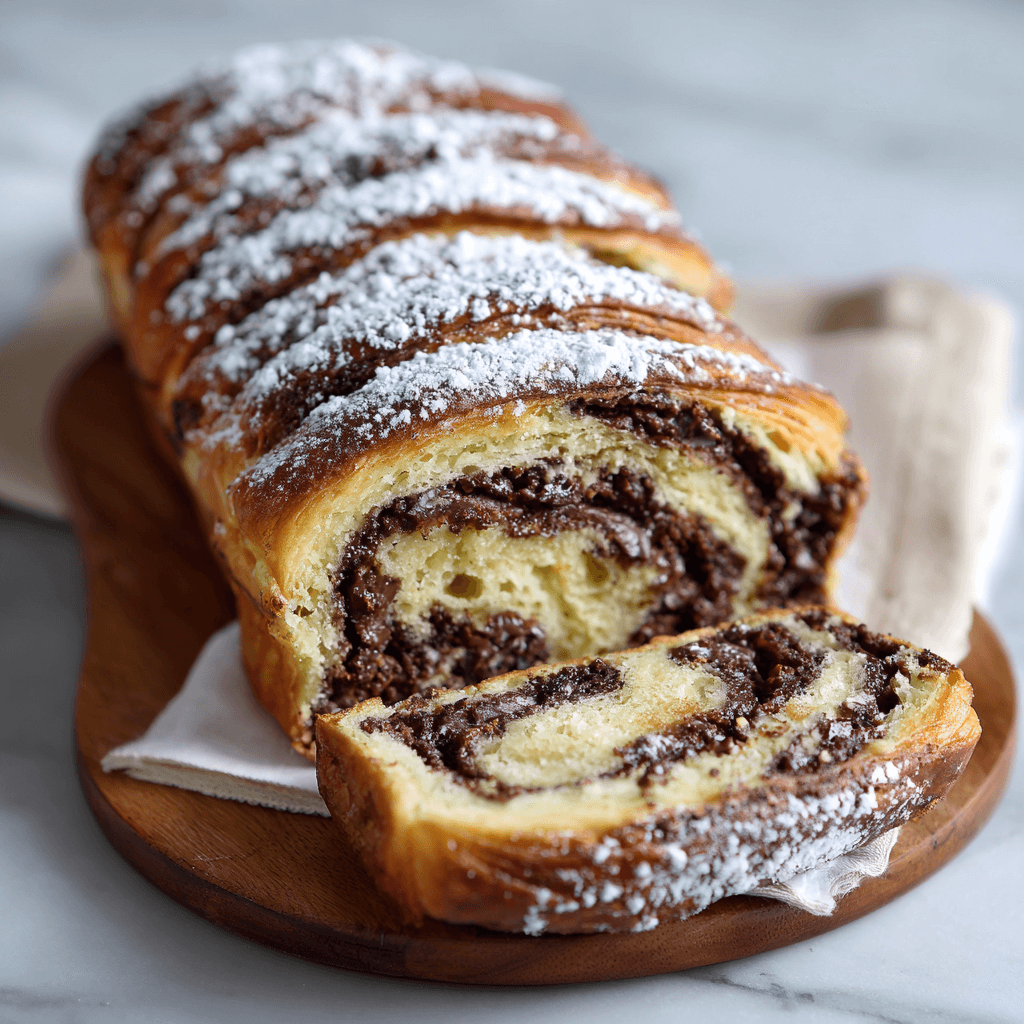
This chocolate croissant loaf uses a simplified laminated dough method—folding cold butter into yeast dough—to create flaky, pull-apart layers in a loaf-pan shape. A cocoa-forward chocolate filling melts into the spiraled interior, giving you a rich, bakery-style bread with crisp edges and a tender, layered crumb.
Why You’ll Love This Recipe
- Croissant-like layers in loaf form — Laminating butter into the dough creates airy, flaky sheets that slice beautifully.
- Deep chocolate payoff — Cocoa, chocolate chips, and vanilla combine for a filling that tastes rich and aromatic.
- Showstopper with minimal decorating — The spiral and golden crust look impressive without frosting or piping.
- Perfect for sharing — Loaf-pan baking makes it easy to portion for brunch, coffee breaks, or dessert.
- Make-ahead friendly process — Chill breaks between folds let you pause the recipe and improve handling.
- Great texture contrast — Crisp, buttery exterior with a soft interior and gooey chocolate pockets.
Ingredients You’ll Need
For the Croissant Dough
- 2 1/4 cups all-purpose flour — Builds the dough structure needed to hold laminated layers without tearing.
- 1/2 teaspoon salt — Strengthens gluten and balances sweetness, improving overall flavor.
- 1 tablespoon granulated sugar — Lightly sweetens and helps yeast activity and browning.
- 1 packet (2 1/4 teaspoons) active dry yeast — Leavens the dough, creating lift between layers.
- 3/4 cup warm milk (about 110°F / 43°C) — Hydrates flour and activates yeast; warm (not hot) prevents killing it.
- 1/4 cup unsalted butter, melted — Adds richness and tenderness to the base dough.
- 1 large egg — Improves dough elasticity and adds richness for a softer crumb.
For the Butter Layer
- 1/2 cup unsalted butter, cold and cut into small pieces — The lamination fat; melts in the oven to create flaky separation.
- 1/2 cup all-purpose flour (for rolling) — Prevents sticking during rolling and folding; use lightly to avoid drying the dough.
For the Chocolate Filling
- 1 cup semi-sweet chocolate chips — Provides melty chocolate pockets and sweetness in the swirl.
- 1/4 cup cocoa powder — Intensifies chocolate flavor and darkens the filling for a more “pain au chocolat” profile.
- 1/4 cup powdered sugar — Sweetens and slightly thickens the filling so it stays put while rolling.
- 1 teaspoon vanilla extract — Adds aromatic warmth that rounds out cocoa bitterness.
Step-by-Step Instructions
- Activate the yeast — Stir warm milk, sugar, and yeast together and let stand 5–10 minutes until foamy; this confirms the yeast is active.
- Mix the dry base — Whisk flour and salt in a large bowl to evenly distribute seasoning and support consistent gluten development.
- Form the dough — Add melted butter, egg, and the yeast mixture, then mix until a shaggy dough forms and no dry flour remains.
- Knead and first rise — Knead on a lightly floured surface for about 5 minutes until smooth and elastic; place in a greased bowl, cover, and rise about 1 hour until doubled.
- Prepare the butter block — Flatten cold butter pieces between parchment into a rectangle about 1/2 inch thick, then chill until firm so it stays in distinct layers.
- Roll the dough out — After rising, roll dough to about 12 × 18 inches; aim for even thickness so lamination is uniform.
- Encase the butter — Place the chilled butter block in the center, fold dough over it completely, and seal edges to prevent butter leakage during rolling.
- Laminate with turns — Roll to a rectangle, fold into thirds like a letter, wrap, and chill 30 minutes; repeat two more turns, chilling 30 minutes between each to keep butter cold and layers defined.
- Mix the chocolate filling — Combine chocolate chips, cocoa powder, powdered sugar, and vanilla until evenly blended; break up cocoa lumps for a smoother spread.
- Final roll-out — After the last chill, roll dough to about 12 × 24 inches, keeping edges straight to help create an even spiral.
- Fill and roll — Spread filling evenly, then roll tightly from a long side into a log; pinch the seam to seal so it doesn’t unravel during baking.
- Proof in the pan — Place seam-side down in a greased loaf pan, cover, and proof about 30 minutes until puffy and slightly springy.
- Bake and protect the crust — Bake at 375°F (190°C) for 20–25 minutes until deeply golden and cooked through; tent with foil if browning too quickly.
- Cool before slicing — Rest 10 minutes in the pan, then cool fully on a rack so the crumb sets and the chocolate doesn’t smear when cut.
Recipe Notes & Tips
- Temperature control is everything — Keep the butter cold during turns; if it softens, chill the dough longer so the butter stays as a sheet rather than absorbing into the dough.
- Use light flour while rolling — Too much bench flour can dry the dough and make layers less distinct; dust lightly and brush off excess before folding.
- Even thickness = even layers — Roll with steady pressure from center outward; thick spots can cause uneven lift and butter blowouts.
- Seal edges well — Any gaps allow butter to escape during rolling or baking, reducing flakiness and making the loaf greasy on the bottom.
- Proof to “puffy,” not doubled — Over-proofing can weaken structure, causing collapse; the loaf should look inflated and jiggle slightly when nudged.
- Check doneness beyond color — A deeply golden crust can happen before the center is set; if unsure, cool 10 minutes and check that the loaf feels firm and not wet in the middle.
Nutritional Information
- Prep Time: 30 minutes (plus chilling/proofing time)
- Cooking Time: 20–25 minutes (note: your header lists 1 hour; the written bake step is 20–25 minutes—use the bake time as written unless you intentionally want a longer bake)
- Chilling/Resting Time: About 1 hour 30 minutes (3 × 30-minute chills) + rising/proofing (about 1 hour 30 minutes total)
- Total Time: About 4–5 hours including rises and chills (hands-on time is much less)
- Servings: 10–12 slices (depending on loaf pan size and slice thickness)
- Calories: ~320–420 per slice (estimate; varies with butter/chocolate brands and portion size)
Perfect Pairings
- Cappuccino or strong brewed coffee — Espresso bitterness balances buttery layers and sweet chocolate.
- Fresh strawberries or raspberries — Tart fruit cuts richness and adds a bright contrast.
- Lightly sweetened whipped cream — Soft, neutral topping that highlights the flaky texture.
- Orange marmalade — Citrus notes amplify chocolate flavor in a classic pastry-style pairing.
Ideal Occasions
- Brunch spreads — Slices neatly and feels special alongside fruit and coffee.
- Holiday mornings — Laminated pastry vibes without needing individual croissant shaping.
- Bake-and-share gifts — A loaf travels well and looks impressive wrapped as a present.
- Dessert with minimal fuss — Warm a slice and you have a plated dessert without extra components.
Storage & Serving Tips
- Room temperature storage — Wrap tightly and keep 1–2 days for best flake; laminated bakes stale faster than standard bread.
- Refrigeration — Refrigerate up to 4 days; rewarm slices to restore tenderness and aroma.
- Freezing — Freeze slices (or the whole loaf) well-wrapped up to 2 months; thaw at room temp, then reheat briefly.
- Best way to reheat — Warm slices in a 300°F (150°C) oven for 6–10 minutes (or a toaster oven) to re-crisp layers without melting chocolate excessively.
Creative Variations to Try
- Hazelnut-chocolate swirl — Add 2–3 tablespoons hazelnut spread in thin streaks over the cocoa layer for a praline note.
- Dark chocolate and sea salt — Swap to dark chips and sprinkle a pinch of flaky salt over the filling before rolling for contrast.
- Cherry-chocolate bakery vibe — Scatter 1/3 cup dried cherries over the filling for a fruity, pastry-shop flavor.
- Mocha loaf — Add 1 teaspoon espresso powder to the cocoa mixture to deepen chocolate and boost aroma.
Troubleshooting Common Issues
- Butter leaks during rolling or baking — Dough or butter was too warm or edges weren’t sealed; chill longer between turns and ensure full enclosure before rolling.
- Layers look bready, not flaky — Butter likely softened into the dough; keep butter firm, roll evenly, and avoid heavy flouring that can compress layers.
- Center is underbaked — Crust browned too fast; tent with foil earlier and extend bake in 5-minute increments until the loaf feels set and not squishy.
- Filling spills out while rolling — Spread a thinner, more even layer and leave a 1/2-inch border on one long edge to help the seam seal cleanly.
Why This Recipe Works
The loaf gets its signature croissant-like texture from lamination: a cold butter sheet is trapped inside dough, then rolled and folded to create repeating layers of dough and butter. In the oven, water in the butter turns to steam, physically separating those layers while yeast expansion adds lift, giving you a flaky, pull-apart crumb rather than a standard bread texture. Chilling between turns keeps the butter solid so it stays as distinct sheets instead of absorbing, which is what preserves the layered structure. The chocolate mixture melts into the spiral and clings between folds, delivering rich flavor without needing frosting. Calorie-wise, this is a naturally indulgent pastry-style loaf (estimated ~320–420 calories per slice) because the flake depends on butter and the filling relies on chocolate for body and intensity.
Final Thoughts
Chocolate croissant loaf is a rewarding bake that delivers the drama of laminated pastry in an approachable, shareable format. With careful chilling and gentle rolling, you’ll get crisp, buttery layers and a chocolatey swirl that feels straight from a bakery case. For a lighter take, use a thinner chocolate layer, swap some chips for chopped dark chocolate (often more intense so you can use less), and serve with fresh fruit to balance richness.