
Follow Me On Social Media!

Cheesy Oven-Baked Tacos: Crispy Shells and Melty Middles Revolution.
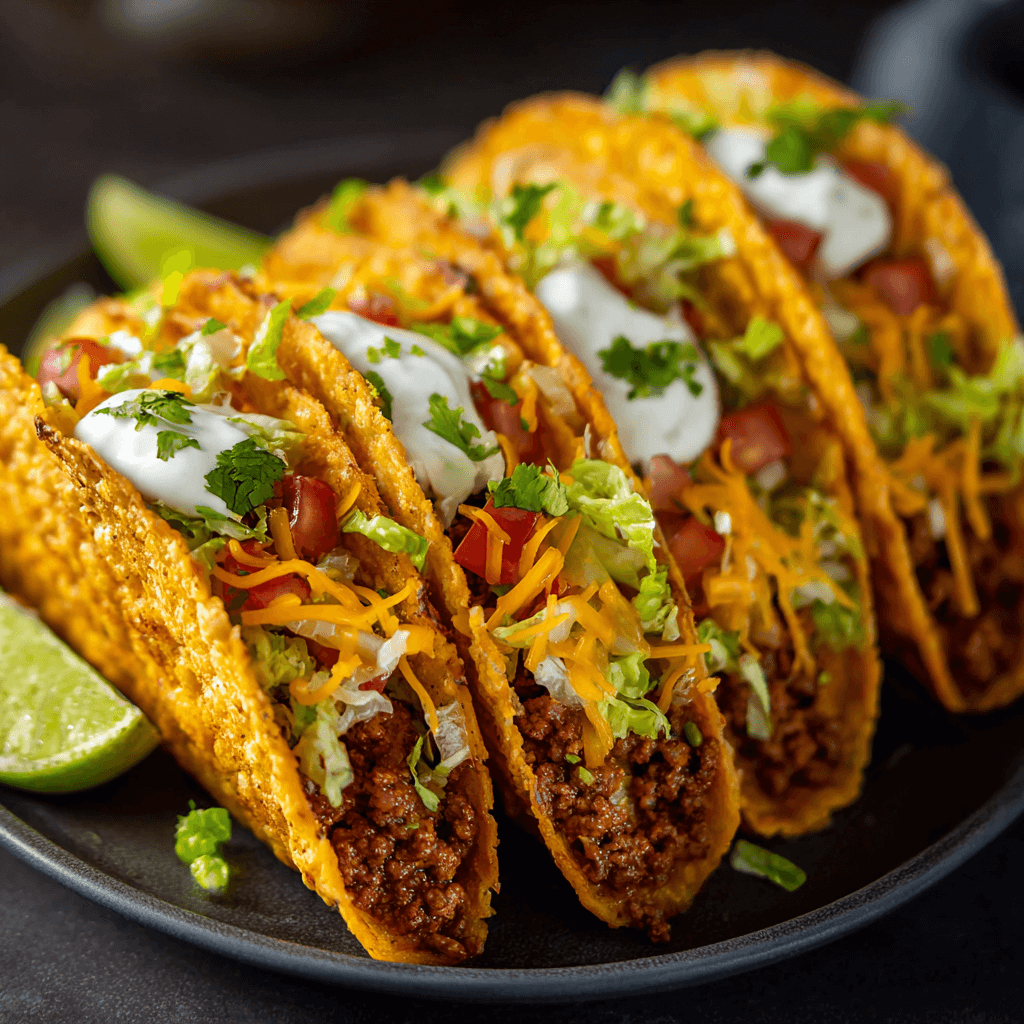
Taco night is a weekly ritual in many homes, but let’s be honest: the standard assembly line of soft, sometimes soggy, tortillas and cold fillings can feel a little anticlimactic. We’re here to change that. Forget the frantic table-side assembly and meet the Cheesy Oven-Baked Taco, a game-changer that combines the best parts of a taco and a quesadilla into one spectacular, self-contained handheld meal.
The brilliance of this method is simple: we stuff the tortillas with a savory filling and a generous amount of cheese, fold them, and then bake them until the shells are wonderfully crispy and golden-brown, while the centers are hot, gooey, and irresistibly melty. The oven locks the flavors and textures together, eliminating spillage and delivering pure comfort in every crunchy bite.
This recipe uses a simple, deeply flavorful seasoned ground beef filling, but the true magic is the technique. The combination of baking the taco ensures a structural integrity that standard tacos can only dream of. It’s a perfect dish for feeding a crowd—you can assemble them all at once on a baking sheet—or for making a simple weeknight dinner that feels entirely new.
Get ready for a cheesy, crispy, and savory taco experience that is easy to make and absolutely fun to eat. Say goodbye to floppy shells and hello to your new favorite taco night tradition!
🥩 Ingredients
This recipe is flexible, but the key to the texture is using corn or a small flour tortilla and plenty of melty cheese.
For the Savory Filling
- 1 pound (450g) ground beef (80/20 blend recommended for flavor)1
- 1 medium yellow onion, finely diced
- 2 cloves garlic, minced
- 1 (10-ounce) can diced tomatoes with green chilies (drained)
- 2 tablespoons taco seasoning (or your favorite blend of chili powder, cumin, paprika, and oregano)2
- 1/2 teaspoon fine sea salt (or to taste)
- 1/4 cup (60ml) beef broth or water
For Assembly
- 12-16 small flour tortillas (taco size) or corn tortillas
- 1 1/2 cups (175g) shredded sharp cheddar cheese, Monterey Jack, or a Mexican blend (essential for that melty middle)
- 2 tablespoons neutral oil (like canola or vegetable oil) or cooking spray3
Suggested Toppings (Add after baking)
- Shredded lettuce
- Diced tomato or pico de gallo
- Sour cream or plain Greek yogurt
- Salsa or hot sauce
📝 Instructions: The Crispy-Shell Technique
The folding and baking steps are what transform these from standard tacos into a unique, crunchy oven-baked delight.
1. Cook the Filling
- Brown Meat: In a large skillet over medium-high heat, brown the ground beef, breaking it up with a spoon. Drain off any excess grease once browned.
- Sauté Aromatics: Add the diced onion to the skillet and cook for 3–4 minutes until softened. Stir in the minced garlic and cook for 1 minute until fragrant.
- Season and Simmer: Stir in the taco seasoning and salt, cooking for 1 minute. Add the drained diced tomatoes with chilies and the beef broth. Bring the mixture to a simmer, then reduce the heat to low and cook for 5–8 minutes, allowing the liquid to reduce and the flavors to fully meld. The filling should be moist but not watery. Remove from heat.
2. Assemble and Prep the Baking Sheet
- Preheat: Preheat your oven to $400^{\circ}\text{F}$ ($200^{\circ}\text{C}$). Lightly grease or line a large rimmed baking sheet with parchment paper.
- Warm Tortillas (Optional but Recommended): Briefly warm the tortillas in the microwave for 30 seconds (wrapped in a damp paper towel) or in a dry skillet. This makes them pliable and prevents cracking when folding.
- Brush Tortillas: Brush one side of each tortilla lightly with oil or spray with cooking spray. This side will face up on the baking sheet and become the crispy exterior.
3. Load and Fold the Tacos
- Layer Cheese: Lay the tortillas, oil-side up, on a clean surface. Sprinkle a thin layer of cheese just slightly off-center on the non-oiled side of the tortilla. This prevents the filling from escaping.
- Add Filling: Scoop a generous amount (about $1/4$ cup) of the meat filling over the cheese layer.
- Top with Cheese: Sprinkle a final layer of cheese over the meat.
- Fold: Fold the tortilla over the filling, creating a crescent shape. Arrange the folded tacos on the prepared baking sheet with the folded edge (the seam) down, pressing lightly to ensure they stay closed.
4. Bake to Crispy Perfection
- Bake: Bake the tacos for 12–18 minutes. The exact time depends on your oven and tortilla type.
- Monitor Doneness: After about 10 minutes, check the tacos. You are looking for the exposed surfaces to be golden brown and crispy and for the cheese to be completely melted and possibly starting to ooze slightly.
- Flip (Optional for Extra Crisp): For maximum crispiness on both sides, carefully flip the tacos halfway through the baking process.
- Serve: Remove from the oven and serve immediately while the filling is hot and the cheese is beautifully melted.
Flavor & Texture Notes
The Cheesy Oven-Baked Tacos deliver a masterful combination of textures that elevates the entire taco experience.
The shell achieves a perfect crunchy-chewy hybrid texture. The edges, which receive the most direct heat, are wonderfully crisp, while the folded center remains soft and slightly chewy, thanks to the trapped moisture and melted cheese.
The filling is savory and bold—the taco seasoning and caramelized aromatics create a deep, warm flavor. The star, however, is the melty middle. The cheese completely liquefies during the bake, binding the filling together and creating a ribbon of creamy, gooey flavor that oozes out beautifully with every bite. The final result is a structurally sound, highly satisfying bite that is both familiar and wonderfully new.
💡 Tips & Variations
Tip 1: The Cheese Seal
Use a good amount of cheese and sprinkle it near the edges before folding. As the cheese melts, it acts as a “glue” to seal the taco shut, preventing the delicious filling from spilling out during the bake and keeping the shells crispy.
Tip 2: Keeping the Seam Down
Placing the folded tacos seam-side down on the baking sheet is crucial, especially in the first half of baking. This ensures the seam stays pressed and sealed by the heat until the cheese melts and solidifies the fold.
Variation 1: Different Protein
This recipe works wonderfully with other fillings:
- Shredded Chicken: Use shredded rotisserie chicken mixed with salsa and taco seasoning.
- Black Bean & Corn: Use mashed black beans mixed with corn, cumin, and a splash of lime juice for a vegetarian option.
Variation 2: Quesadilla Tacos
For even more cheesy goodness, before folding, add a very thin layer of sharp cheese to the entire inner surface of the tortilla. This will create a thin, crispy layer of cheese between the tortilla and the filling, mimicking a quesadilla base.
Variation 3: Spice Level
If you prefer more heat, add a few dashes of your favorite hot sauce or a 1/2 teaspoon of smoked paprika and a pinch of cayenne pepper to the beef filling during the seasoning step.
🥶 Storage & Make-Ahead
These tacos are excellent for meal prepping and feeding a crowd.
- Filling: The seasoned ground beef filling can be made up to 3 days in advance and stored in the refrigerator. Warm it slightly before assembling the tacos.
- Assemble Ahead: You can assemble the tacos (Steps 1–3) up to 4 hours in advance. Place the assembled, unbaked tacos on the baking sheet, cover lightly with foil or plastic wrap, and refrigerate. Add 2–3 minutes to the baking time since they will be starting cold.
- Leftovers: Leftover baked tacos can be stored in an airtight container in the refrigerator for up to 3 days.
- Reheating: Reheat them in a 4$350^{\circ}\text{F}$ (5$175^{\circ}\text{C}$) oven or in an air fryer for 5–8 minutes.6 The key is to reheat them uncovered so the shells regain their crispness.
🍽️ Serving Suggestions
Since these tacos are the main event, pair them with simple, cooling sides.
- Classic Rice and Beans: Serve with a side of traditional Mexican rice and simple refried or black beans.
- Simple Slaw: A crunchy, cool side of cabbage slaw dressed with lime juice and a hint of cilantro provides a fresh, acidic contrast to the rich, baked tacos.
- Guacamole: A dollop of fresh guacamole or sliced avocado on the side adds the necessary creamy, cool fat that balances the baked filling.
❓ FAQ: Oven-Baked Tacos
Q: Can I use corn tortillas instead of flour?
A: Yes, but they are more prone to cracking. To use corn tortillas, you must warm them very well (wrapped in a damp paper towel and microwaved for 1 minute or quickly fried for a few seconds per side) to make them pliable before folding. You will still need to brush them with oil for crispness.
Q: Why did my cheese leak out everywhere and stick to the pan?
A: This happens if the tacos weren’t placed seam-side down, or if you overstuffed them, pushing the cheese too close to the edges. To prevent sticking, ensure the baking sheet is well-greased (or use parchment paper). If you see a small leak of cheese, don’t worry—the caramelized cheese on the pan is actually delicious and crispy!
Q: Can I bake these without oil/cooking spray?
A: You can, but the shells will not be nearly as crispy or golden. The light coating of fat is what helps the tortilla dry out and crisp up beautifully in the oven, giving you that great crunch without needing to deep-fry.
Q: How can I keep the tacos warm for a party?
A: If you are serving a crowd, place the finished, baked tacos on a wire rack over a baking sheet and keep them in a warming oven (around $200^{\circ}\text{F}$ or $95^{\circ}\text{C}$). The rack allows air circulation, which helps keep the bottoms from getting soggy.
🎉 The Ultimate Taco Upgrade
These Cheesy Oven-Baked Tacos are a simple yet transformative way to elevate your favorite weeknight meal. They deliver all the robust, savory flavor you expect, sealed inside a crispy shell with a heart of melted cheese. It’s a fun, mess-free, and incredibly delicious way to enjoy taco night.