Follow Me On Social Media!

No-Bake Biscoff Cheesecake Cups: Creamy, Spiced, and Perfectly Portioned.
There is a singular kind of magic that happens when you combine the rich, caramelized spice of Biscoff cookies with the smooth, tangy texture of cheesecake. It’s comforting, nostalgic, and utterly irresistible. But what if you could achieve that luxurious dessert experience without ever having to turn on your oven?
These No-Bake Biscoff Cheesecake Cups are the answer. They deliver all the deep flavor of a traditional baked cheesecake—the buttery crust, the cool, creamy filling—but in a quick, simple, and perfectly portioned individual cup. This makes them ideal for effortless entertaining, easy make-ahead desserts, or just satisfying a sudden, intense craving for something sweet and spiced.
The base is a simple, buttery Biscoff crust, but the real star is the filling. We combine cream cheese with a generous swirl of Biscoff cookie butter, adding a hint of vanilla and a secret ingredient (a touch of lemon juice) to mimic the slight tang of traditional cheesecake.1 Once chilled, the filling sets into a firm, yet silky-smooth cream.
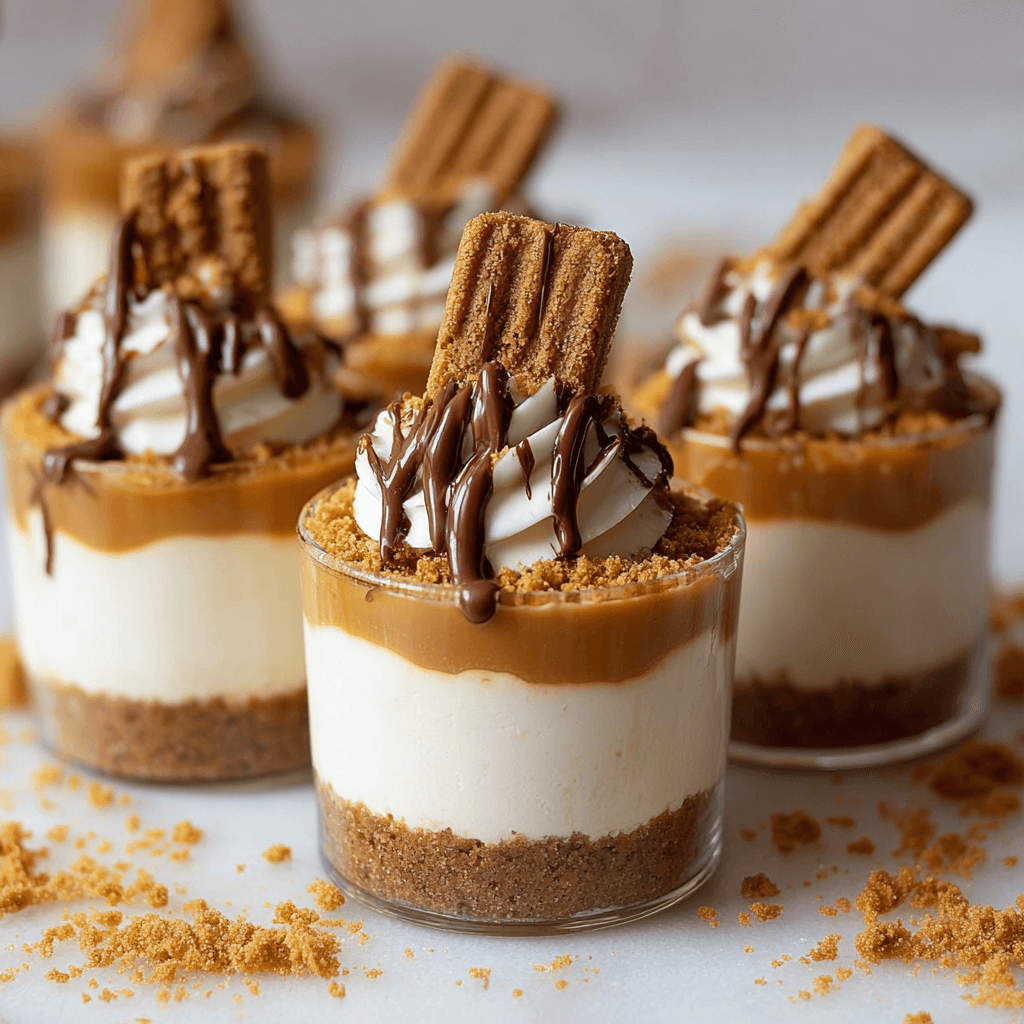
Finished with a dramatic drizzle of melted cookie butter and a final cookie crunch, these cups are a study in contrasting textures: crisp, creamy, and gooey. They’re easy to make, require no fussy water baths or cooling times, and deliver an over-the-top, spiced dessert that will have everyone asking for the recipe.
🍪 Ingredients
Using full-fat dairy products is key here, as the fat content is what helps the cheesecake filling set firmly without baking.
For the Spiced Biscoff Crust
- 1 1/2 cups (150g) Biscoff cookies (or other spiced ginger snaps), crushed finely
- 4 tablespoons (56g) unsalted butter, melted
For the Creamy No-Bake Filling
- 1 (8-ounce) block (226g) full-fat cream cheese, softened to room temperature
- 1/2 cup (100g) granulated sugar or powdered sugar
- 1/4 cup (60ml) heavy cream (cold)
- 1/2 cup (140g) Biscoff cookie butter (smooth variety is easiest to mix)
- 1 teaspoon vanilla extract2
- 1/2 teaspoon fresh lemon juice (optional, for tang)
- Pinch of fine sea salt
For Topping & Garnish
- 1/4 cup (70g) Biscoff cookie butter, melted for drizzling
- 6-8 whole Biscoff cookies, for garnish
📝 Instructions: Quick Assembly and Chill
The speed of this recipe is its greatest advantage. The long chill time is the only thing standing between you and dessert!
1. Make the Biscoff Crust
- Crush Cookies: Place the Biscoff cookies into a food processor and pulse until fine crumbs form. Alternatively, place them in a zip-top bag and crush them with a rolling pin.
- Combine: In a medium bowl, combine the cookie crumbs and the melted butter. Stir until the crumbs are evenly moistened.
- Press into Cups: Divide the crumb mixture evenly among 6–8 small cups, jars, or ramekins. Use the back of a spoon or a small measuring cup to firmly press the crumbs into an even layer at the bottom of each container.
- Chill: Place the crusts in the refrigerator while you prepare the filling.
2. Prepare the No-Bake Filling
- Cream Cheese Base: In a large bowl, use a hand mixer or stand mixer to beat the softened cream cheese and sugar together on medium speed until the mixture is completely smooth and no granules of sugar remain (about 2–3 minutes). Scrape down the bowl.
- Add Flavoring: Beat in the vanilla extract, lemon juice, and salt until incorporated.
- Whip in Cookie Butter: Add the $1/2$ cup of cookie butter and beat until the mixture is uniform in color and completely smooth.
- Add Heavy Cream: Pour in the cold heavy cream. Beat on medium-high speed for 2–3 minutes. The mixture will become thicker, lighter, and noticeably fluffier as air is incorporated and the filling begins to stabilize.
3. Assemble and Chill the Cups
- Fill the Cups: Spoon the Biscoff cheesecake filling into a large piping bag (or a large zip-top bag with the corner snipped off) for easy, neat distribution. Alternatively, just use a spoon.
- Pipe/Spoon: Divide the filling evenly over the chilled crusts, filling each cup almost to the top. Smooth the tops with a small offset spatula or the back of a spoon.
- Chill (Crucial Step): Cover the cups lightly and transfer them to the refrigerator.3 Chill for a minimum of 4 hours, but ideally overnight, to allow the filling to fully set and firm up.4
4. Garnish and Serve
- Melt Cookie Butter: When ready to serve, melt the reserved $1/4$ cup of cookie butter in the microwave for 30–45 seconds until it is liquid and easily drippable.
- Drizzle and Garnish: Drizzle a generous amount of the melted cookie butter over the top of each chilled cup. Place one whole Biscoff cookie in the filling (or crush one and sprinkle the crumbs) for a final garnish.
- Enjoy: Serve immediately while the filling is cool and set.
Flavor & Texture Notes
These No-Bake Biscoff Cheesecake Cups are a delightful study in comforting flavors and textures.
The base provides an instant hit of spiced, caramelized flavor from the Biscoff cookies, which softens slightly in the refrigerator while maintaining a slight crumbly crunch.
The filling is the star: cool, intensely creamy, and velvety smooth. It has a pronounced flavor of sweet cream cheese blended perfectly with the deep, warm spice notes of the cookie butter (cinnamon, nutmeg, ginger). The chilling process sets the filling firmly, giving it the satisfying density of baked cheesecake, but the added heavy cream ensures it remains wonderfully light and not overly dense.
The final warm, gooey drizzle of cookie butter melts into the cool filling, creating an extra layer of soft, sweet indulgence.
💡 Tips & Variations
Tip 1: The Cream Cheese Temperature
The cream cheese must be fully softened to room temperature. If it is cold, it will not mix smoothly with the sugar and cookie butter, leaving lumps in your final filling.
Tip 2: Achieving the Best Set
Using full-fat cream cheese and whipping the cold heavy cream into the mixture are the two structural keys. The fat content and the aeration from the whipping action stabilize the mixture, ensuring it sets without the need for gelatin or baking.
Variation 1: Mini Bites
Use a mini muffin tin lined with paper liners instead of cups. Press the crust into the bottom, top with filling, and freeze for 1 hour for perfectly portioned Biscoff Cheesecake Bites.
Variation 2: Salted Caramel Kick
Stir 1/4 teaspoon of flake sea salt directly into the cream cheese filling before adding the heavy cream. This will enhance the overall caramel notes of the Biscoff flavor.
Variation 3: Spice Layer
Add a pinch of cinnamon and a small grating of fresh nutmeg into the cream cheese filling along with the vanilla extract for an even more intense spiced flavor profile.
❄️ Storage & Make-Ahead
These individual cups are perfect for making ahead and storing.
- Make-Ahead: The cups can be assembled and refrigerated up to 2 days in advance.
- Storage: Store leftovers, covered, in the refrigerator for up to 5 days.
- Freezing: These cheesecake cups freeze well! Freeze them uncovered for 1 hour until solid, then wrap the individual cups tightly in plastic wrap and aluminum foil. Freeze for up to 1 month. Thaw in the refrigerator for 2–3 hours before serving. Wait to add the final cookie butter drizzle and garnish until serving.
☕ Serving Suggestions
These rich cups are best balanced with simple drinks and light finishes.
- Coffee Partner: Serve with a hot cup of black coffee or a latte. The bitterness of the coffee is the ideal counterpoint to the sweetness of the Biscoff and cream cheese.
- Fresh Fruit: A small side of fresh, tart berries (like raspberries or red currants) adds a beautiful color contrast and an acidic note that cuts through the richness.
- Whipped Cream: For extra richness, skip the cookie butter drizzle and top with a dollop of fresh, unsweetened whipped cream.
✨ The Sweet Reward of No-Bake
These No-Bake Biscoff Cheesecake Cups prove that sometimes, the simplest methods yield the most satisfying results. You get the complexity of a spiced dessert, the creamy texture of a classic cheesecake, and the joyful crunch of cookies, all without any oven time.
Whip up a batch, let the fridge work its magic, and prepare to enjoy a cool, creamy, and wonderfully spiced treat that will surely become your new no-bake favorite.