Follow Me On Social Media!

Mint Chocolate Sandwich Cookies: Crisp, Creamy, and Cool-Filled Classic.
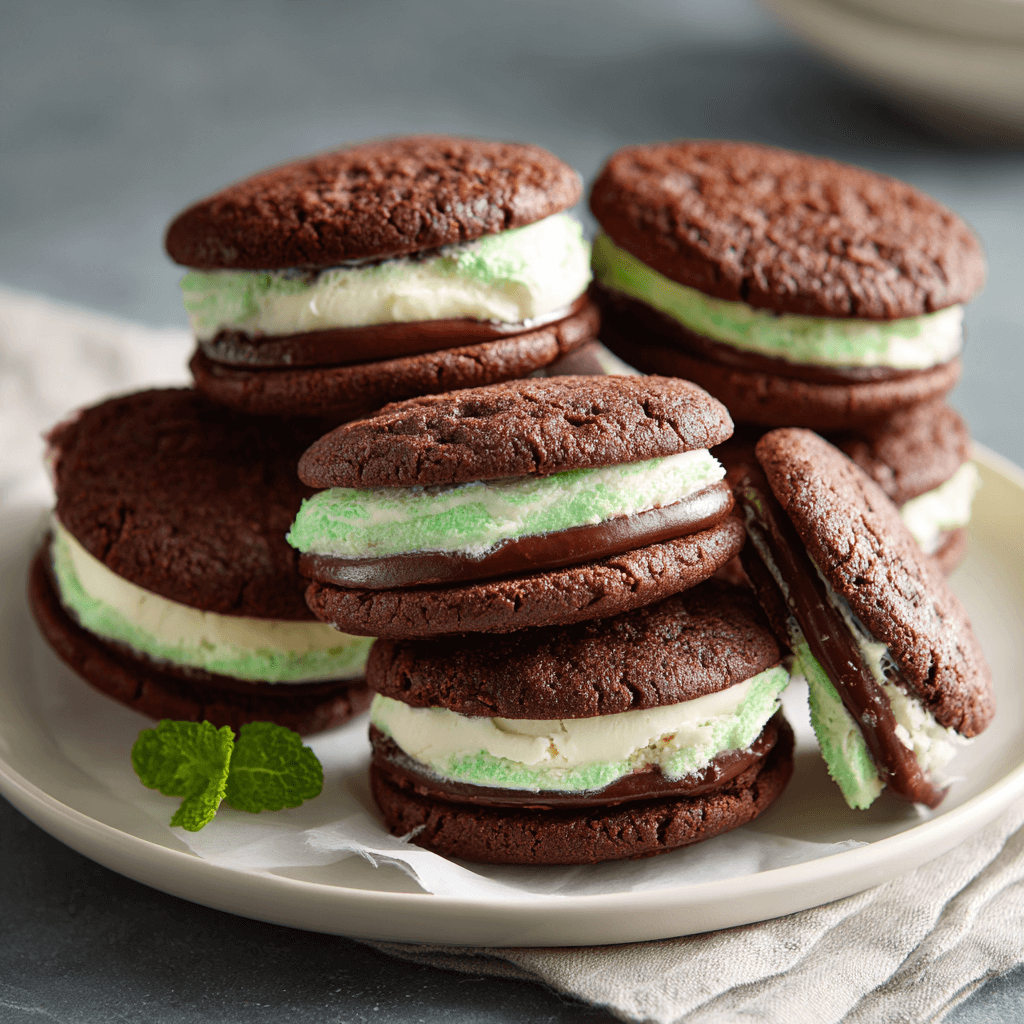
There are flavor combinations that simply work, year after year, no matter the season. Mint and chocolate is one of those timeless pairings—a vibrant, cooling sensation wrapped up in rich, deep cocoa.1 While you can find this combination in countless forms, nothing beats the satisfaction of a perfectly crafted Mint Chocolate Sandwich Cookie.
These aren’t just any chocolate cookies. We’re aiming for a dark, intense chocolate wafer that is crisp and sturdy, designed specifically to hold a decadent, velvety filling. The cookie itself delivers a deep cocoa flavor that provides the perfect, slightly bitter contrast to the sweet, cooling mint crème center.
The secret to a great sandwich cookie lies in the balance: the wafer must be just thick enough to provide a satisfying snap, and the filling must be rich enough to be creamy without being overly greasy. This recipe achieves both, using a touch of black cocoa powder for that distinctive, dark color and complex flavor, and relying on powdered sugar and butter for a silky-smooth, cool mint filling.
Whether you’re looking for a special treat for a holiday cookie tray, a refreshing dessert after dinner, or just a fun baking project, these homemade sandwich cookies deliver on every promise. They are visually striking, structurally sound, and provide that perfect, nostalgic balance of deep chocolate and bright, creamy mint.
🍫 Ingredients
We use a two-part ingredient list: one for the dark, crisp wafer and one for the smooth, green filling.
For the Dark Chocolate Wafers
- 1 1/2 cups (180g) all-purpose flour
- 1/2 cup (45g) unsweetened cocoa powder (use Dutch-process for richness)2
- 2 tablespoons black cocoa powder (optional, but highly recommended for color and depth)
- 1 teaspoon baking soda
- 1/2 teaspoon fine sea salt
- 1/2 cup (1 stick or 113g) unsalted butter, softened to room temperature
- 3/4 cup (150g) granulated sugar3
- 1 large egg, room temperature4
- 1 teaspoon vanilla extract
For the Cool Mint Crème Filling
- 1 cup (2 sticks or 226g) unsalted butter, softened to room temperature
- 3 cups (360g) powdered sugar, sifted
- 1/2 teaspoon fine sea salt
- 1 teaspoon peppermint extract (start here, then add more to taste)
- 1 tablespoon whole milk or heavy cream (plus more if needed)
- 2–3 drops green gel food coloring (use gel, not liquid, for intense color)
📝 Instructions
Patience is key with these cookies, especially when it comes to rolling and cooling the dough.
1. Make the Chocolate Wafer Dough
- Combine Dry Ingredients: In a medium bowl, whisk together the all-purpose flour, both cocoa powders, baking soda, and salt. Set aside.
- Cream Butter and Sugar: In a stand mixer fitted with the paddle attachment (or using a hand mixer), cream the softened butter and granulated sugar together on medium speed for 3–4 minutes until light and fluffy.
- Add Wet Ingredients: Beat in the egg and vanilla extract until just combined. Scrape down the sides of the bowl.
- Combine: Gradually add the dry ingredients to the wet mixture, mixing on low speed until a thick, dark, cohesive dough forms. Do not overmix.
- Chill (Mandatory): Shape the dough into a thick disc, wrap it tightly in plastic wrap, and refrigerate for a minimum of 2 hours, or up to 2 days. The chilling is essential for the cookies to hold their crisp shape and prevent spreading.
2. Roll, Cut, and Bake the Wafers
- Preheat and Prep: Preheat your oven to $350^{\circ}\text{F}$ ($175^{\circ}\text{C}$). Line two baking sheets with parchment paper.
- Roll the Dough: Remove the chilled dough from the refrigerator and let it sit at room temperature for about 10 minutes to soften slightly. On a lightly floured surface, roll out half of the dough to a thickness of about 1/8 inch. Thin dough is necessary for a crisp sandwich cookie.
- Cut Shapes: Use a 2-inch round or square cookie cutter to cut out the shapes. Place the cutouts about 1 inch apart on the prepared baking sheets. Reroll the scraps.
- Bake: Bake the wafers for 9–11 minutes. The cookies will look done when the tops are dry and the edges are firm.
- Cool: Let the cookies cool on the baking sheet for 5 minutes before transferring them to a wire rack to cool completely. They must be entirely cool before filling.
3. Prepare the Mint Crème Filling
- Cream Butter: In a clean bowl with the paddle attachment, beat the 1 cup of softened butter for 2 minutes until very pale and fluffy.
- Add Flavor: Beat in the salt and peppermint extract.
- Add Powdered Sugar: Gradually add the sifted powdered sugar, one cup at a time, mixing on low speed until combined, then increasing to medium.
- Achieve Crème Consistency: Beat in the milk or cream and the green gel food coloring until the filling is smooth, light, and spreadable. If the filling seems too stiff, add a few extra drops of milk. Taste the filling and add an extra drop of peppermint extract if you desire a stronger mint flavor.
4. Assemble the Cookies
- Match: Pair up the cooled cookies by size, ensuring you have an even number of tops and bottoms.
- Fill: Scoop or pipe the mint filling onto the flat side of one cookie. Use a small offset spatula to spread the filling almost to the edge.
- Sandwich: Gently top the filling with the matching cookie. Press down very lightly until the filling is spread evenly to the edges.
- Set: Place the finished Mint Chocolate Sandwich Cookies on a tray and refrigerate for 20–30 minutes before serving. This allows the filling to firm up, making the cookies easier to handle.
Flavor & Texture Notes
These cookies are a masterful blend of flavor and texture designed for maximum impact.
The wafer itself is crisp, thin, and deep in chocolate flavor, especially when using black cocoa, which lends an almost Oreo-like darkness and richness. It has a satisfying snap without being hard or brittle.
The filling is the cool star: a creamy, velvety, rich buttercream that holds its shape beautifully. The peppermint extract delivers an immediate, clean, cooling sensation that cuts through the richness of the butter and chocolate. The texture of the filling is smooth, providing a perfect, soft counterpoint to the crispness of the wafer.
The overall taste is a classic, refreshing marriage of deep chocolate and cool mint, balanced perfectly in one elegant sandwich.
💡 Tips & Variations
Tip 1: Dark Color Magic
The secret to achieving that deep, classic dark chocolate color is the black cocoa powder. It has less fat than regular cocoa and imparts a striking deep black-brown hue without adding bitterness. If you don’t have it, use all Dutch-process cocoa, and the color will still be deep.
Tip 2: Piping for Perfection
For the neatest, most professional-looking cookies, transfer the mint filling to a piping bag fitted with a large round tip. Pipe a simple, even swirl of filling onto the bottom wafer, then gently press the top wafer down.
Tip 3: Peppermint Control
Start with the recommended 1 teaspoon of peppermint extract in the filling. Peppermint extract is potent, and a little goes a long way. Taste the filling before adding more. You want the mint to be refreshing, not overwhelming.
Variation 1: Mint Chocolate Chip Filling
Fold $1/4$ cup of miniature chocolate chips or finely chopped sugar-free dark chocolate into the finished mint crème filling for a textural surprise.
Variation 2: Dipped Finish
For a fancier look, dip half of the assembled cookies into melted dark chocolate. Place them on a parchment-lined tray and chill until the chocolate sets.
Variation 3: Non-Mint Filling
If you have a group with mixed preferences, you can split the filling batch and flavor half with 1 teaspoon of vanilla and $1/2$ teaspoon of almond extract instead of peppermint.
🥶 Storage & Make-Ahead
These sandwich cookies are great make-ahead treats, as the chilling process helps the flavors marry.
- Dough: Unbaked dough can be kept, tightly wrapped, in the refrigerator for up to 4 days or frozen for up to 3 months.5 Thaw overnight before rolling.
- Unfilled Wafers: Baked, cooled wafers can be stored in an airtight container at room temperature for up to 1 week.
- Assembled Cookies (Best): Once assembled, the cookies are best stored in an airtight container in the refrigerator for up to 5 days. The filling helps keep the wafers soft and fresh. Allow them to sit at room temperature for 10 minutes before serving.
- Freezing Assembled: Freeze assembled cookies in a single layer until solid, then transfer them to a freezer-safe container. Freeze for up to 1 month. Thaw overnight in the refrigerator.
☕ Serving Suggestions
The intense flavor of these cookies makes them perfect paired with simple, complementary beverages.
- Classic Milk: A cold glass of milk is the quintessential partner for these rich cookies, softening the chocolate and enhancing the mint.
- Coffee Pairing: Serve alongside a warm espresso or a cold brew. The bitterness of the coffee cuts through the sweetness and complements the deep cocoa notes.
- Ice Cream Sandwich: Freeze the assembled cookies until rock solid. Use them as the wafers for homemade vanilla bean ice cream sandwiches for an extra cold treat.
❓ FAQ: Cookie Baking
Q: Why did my cookies spread too much and lose their shape?
A: This is likely due to the dough being too warm. Chilling the dough for the full time is non-negotiable for this recipe. If your kitchen is very warm, place the cut cookies back into the refrigerator for 10 minutes before baking to ensure the butter is cold. Also, make sure you used the correct amount of flour and baking soda (baking soda promotes more spread than baking powder).
Q: Can I use regular granulated sugar in the filling?
A: No. You must use powdered sugar (confectioners’ sugar) for the filling. Granulated sugar will not dissolve and will leave a gritty, unpleasant texture in your butter crème filling, ruining the “creamy” experience. Always sift the powdered sugar, too, to eliminate lumps.
Q: My wafers are coming out cakey, not crisp. What am I doing wrong?
A: Cakey cookies are often caused by dough that is too thick. Ensure you are rolling the dough out to 1/8 inch. Also, over-mixing the dough can develop too much gluten, which leads to a cakier texture. Finally, make sure to let them cool fully—they crisp up significantly as they cool down.
Q: Is this recipe good for piping and decorating?
A: Yes! The finished wafer dough is sturdy and holds up well to shaping, and the crème filling is an excellent, pipeable buttercream consistency. The cookies hold their shape well, making them perfect for elaborate plating or adding decorative drizzles.
💚 The Perfect Minty Bite
These Mint Chocolate Sandwich Cookies are more than just a dessert—they are a delightful exercise in balancing flavor, texture, and visual appeal. The crisp snap of the dark wafer and the rush of cool mint filling create a truly iconic bite that is always satisfying.
Go ahead, fill your kitchen with the irresistible scent of cocoa and peppermint. This is one classic that deserves a permanent spot in your baking rotation.