Follow Me On Social Media!

Red Velvet Strawberry Cheesecake – A Stunning Dessert for Any Occasion.
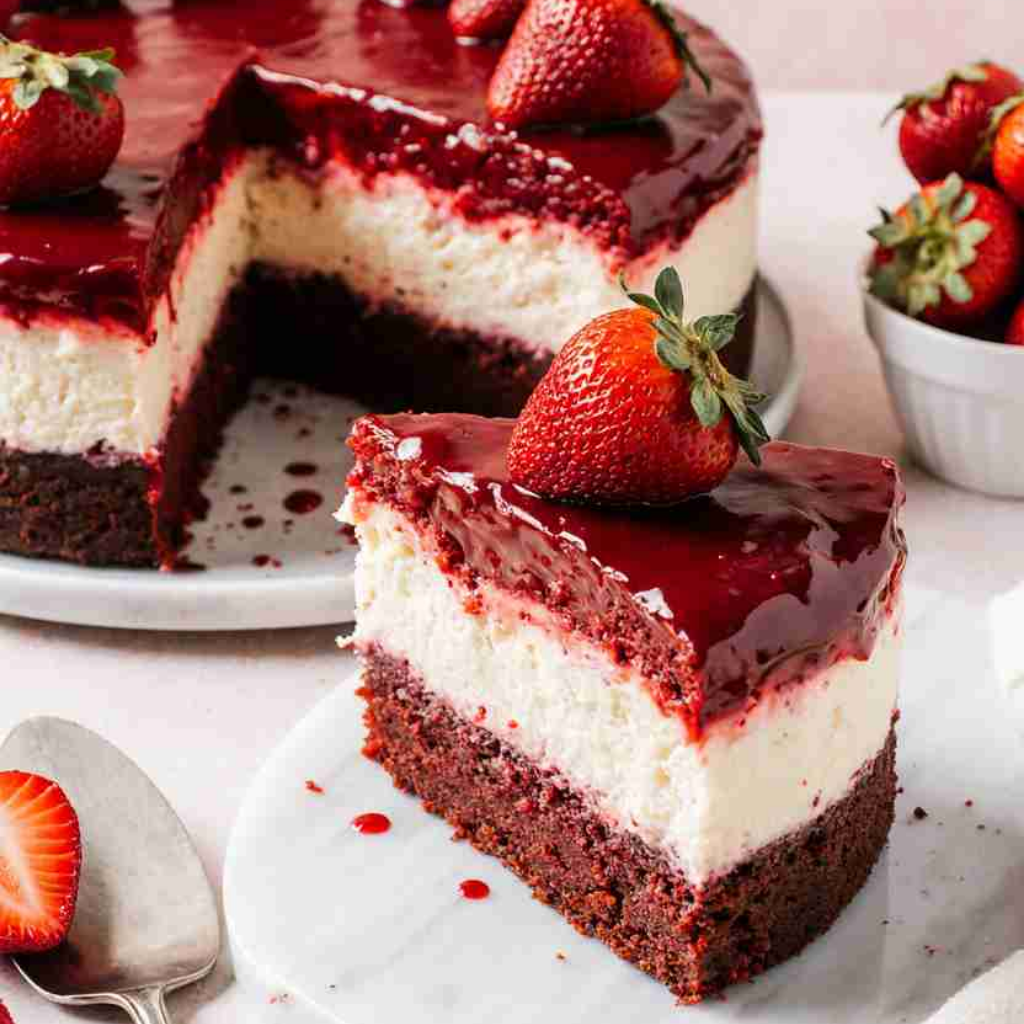
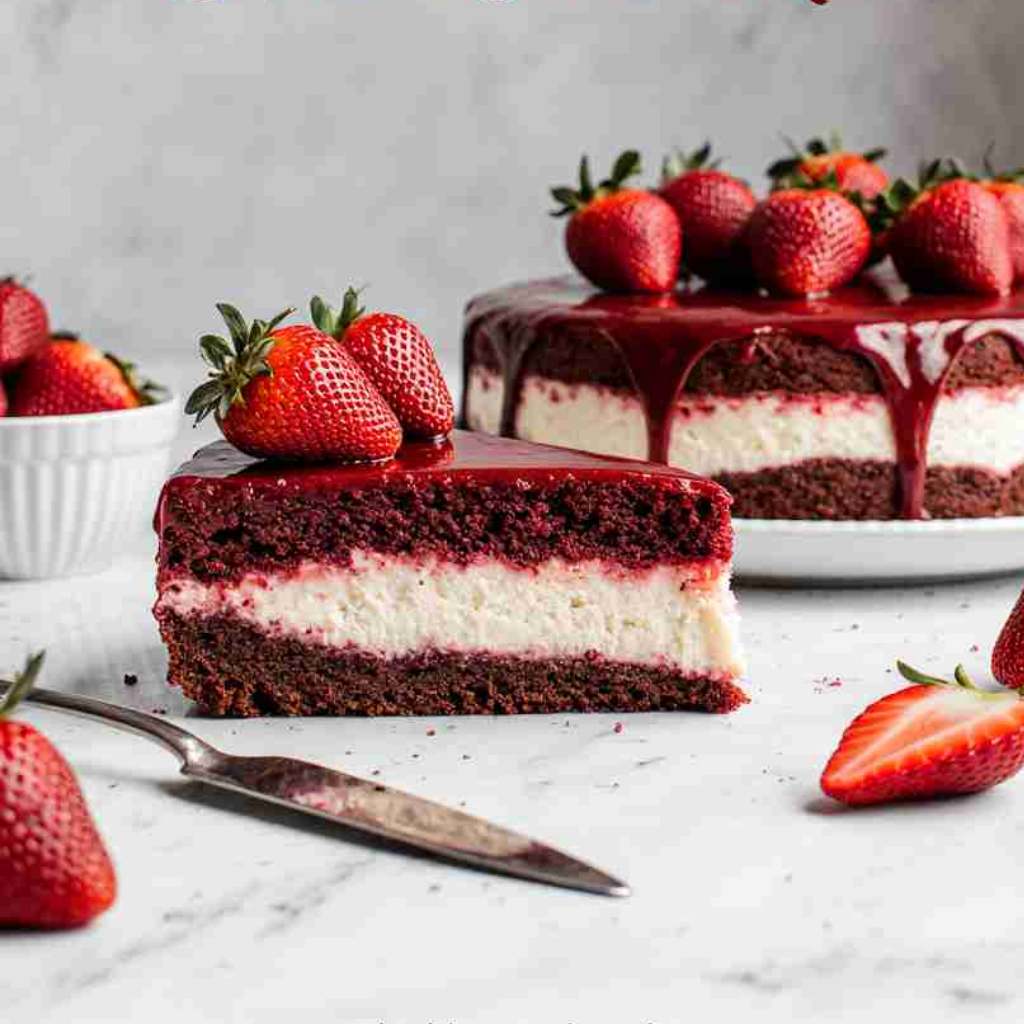
If there were ever a dessert that could turn heads, this Red Velvet Strawberry Cheesecake would be it. With its velvety red cake base, creamy vanilla cheesecake layer, and fresh strawberry topping, this dessert combines three classics into one show-stopping centerpiece.
I first made this cheesecake for a family birthday. I couldn’t decide between baking my signature red velvet cake or my usual baked cheesecake, so I combined the two. The result surprised everyone — the slight cocoa flavor from the red velvet, the smooth tanginess of the cheesecake, and the burst of freshness from macerated strawberries on top came together in perfect harmony. It looked elegant, sliced beautifully, and became the most requested dessert in my family’s repertoire.
This cheesecake isn’t complicated, but it does require a few steps. If you follow them carefully, you’ll end up with a dessert that’s as impressive as any bakery creation — and tastes even better homemade.
Ingredients
For the Red Velvet Cake Layer
- 1 cup all-purpose flour
- 1 tbsp unsweetened cocoa powder
- ½ tsp baking soda
- ¼ tsp salt
- ½ cup buttermilk, room temperature
- ½ tsp white vinegar
- 1 tsp vanilla extract
- 1 tsp red food coloring (gel preferred for a vibrant color)
- ½ cup (1 stick) unsalted butter, softened
- ¾ cup granulated sugar
- 1 large egg
For the Cheesecake Layer
- 16 oz (2 blocks) cream cheese, softened
- ¾ cup granulated sugar
- ½ cup sour cream, room temperature
- 2 tsp vanilla extract
- 2 large eggs, room temperature
For the Strawberry Topping
- 2 cups fresh strawberries, hulled and sliced
- 2 tbsp granulated sugar
- 1 tsp lemon juice
Optional: extra strawberries or whipped cream for garnish
Instructions
Step 1: Preheat and Prep
Preheat your oven to 350°F (175°C). Grease and line the bottom of a 9-inch springform pan with parchment paper. Wrap the outside of the pan tightly with two layers of aluminum foil to prevent leaks during the water bath later.
Step 2: Make the Red Velvet Cake Layer
- In a small bowl, whisk together flour, cocoa powder, baking soda, and salt.
- In a separate bowl, whisk buttermilk, vinegar, vanilla, and red food coloring.
- In a large mixing bowl, cream the softened butter and sugar on medium speed for 2–3 minutes, until light and fluffy. Add the egg and mix until incorporated.
- Alternate adding the dry ingredients and the buttermilk mixture, starting and ending with the dry. Mix on low speed just until combined.
Pour the red velvet batter into the prepared springform pan, smoothing it into an even layer. Bake for 18–20 minutes, or until a toothpick inserted in the center comes out clean. Let it cool slightly while you prepare the cheesecake filling.
Step 3: Make the Cheesecake Filling
- Beat the cream cheese and sugar together on medium speed until smooth and creamy, about 2 minutes.
- Add sour cream and vanilla, mixing until fully incorporated.
- Add eggs one at a time, beating on low speed just until blended. Do not overmix — this helps prevent cracks.
Pour the cheesecake batter over the baked red velvet layer. Smooth the top with a spatula.
Step 4: Bake in a Water Bath
Place the springform pan inside a large roasting pan. Pour hot water into the roasting pan until it reaches halfway up the sides of the springform pan. Bake for 50–60 minutes, or until the edges are set but the center still jiggles slightly when tapped.
Turn off the oven, crack the door open slightly, and let the cheesecake cool inside for 1 hour. This gentle cooling helps prevent cracks on the surface.
Step 5: Chill Completely
Remove the cheesecake from the water bath, unwrap the foil, and let it cool to room temperature. Then refrigerate for at least 6 hours, preferably overnight. Chilling allows the flavors to meld and the texture to fully set.
Step 6: Prepare the Strawberry Topping
About an hour before serving, combine the sliced strawberries, sugar, and lemon juice in a bowl. Let them sit at room temperature for 20–30 minutes, stirring occasionally, until they release their juices and become glossy.
Step 7: Assemble and Serve
Run a thin knife around the edge of the chilled cheesecake before releasing it from the springform pan. Spoon the strawberry topping over the cheesecake just before serving. Add extra fresh strawberries or whipped cream for garnish if desired.
Flavor & Texture Notes
This Red Velvet Strawberry Cheesecake is all about layers — both visually and flavor-wise.
The red velvet cake layer at the bottom is tender with a mild cocoa flavor and a beautiful crimson hue. The cheesecake layer is smooth and creamy, with just enough tang to balance the sweetness of the cake. The fresh strawberry topping adds brightness and a juicy, natural sweetness that elevates the entire dessert.
Each bite combines the slight crumb of cake, the creaminess of cheesecake, and the refreshing fruit — making this dessert taste balanced and not overly heavy, despite its luxurious appearance.
Tips & Variations
- Food Coloring: Gel gives a more vibrant red without thinning the batter. If using liquid coloring, add a little extra flour if needed.
- Water Bath Tip: If you’re worried about leaks, place the springform pan inside a slightly larger cake pan before setting it in the roasting pan. This double-layer method works well.
- Flavor Twist: Swap the strawberries for raspberries or a mixed berry compote for a different seasonal touch.
- Chocolate Drizzle: For extra drama, drizzle melted dark chocolate over the strawberry topping before serving.
- Mini Cheesecakes: You can make this recipe in a lined muffin tin for individual cheesecakes. Adjust baking times accordingly (about 15 minutes for the cake layer, 20–25 for the cheesecake).
- Gluten-Free: Substitute the all-purpose flour with a 1:1 gluten-free flour blend.
Storage & Make-Ahead
- Fridge: Store the cheesecake in the refrigerator, covered, for up to 5 days. Add the strawberry topping just before serving for the freshest texture.
- Freezer: You can freeze the baked and cooled cheesecake (without strawberries) for up to 2 months. Wrap tightly in plastic wrap and foil. Thaw overnight in the fridge before topping and serving.
- Make-Ahead: This is a great make-ahead dessert. You can bake it 1–2 days in advance and chill it until ready to serve.
Serving Suggestions
- Elegant Dessert Table: Serve as the centerpiece for birthdays, Valentine’s Day, or holiday dinners.
- Chocolate Garnish: Add chocolate curls or shards around the edges for a bakery-style presentation.
- Mini Strawberries: Decorate with halved strawberries around the perimeter for a polished look.
- Whipped Cream Border: Pipe whipped cream around the top edge to frame the strawberry topping beautifully.
FAQ
Can I skip the water bath?
Technically yes, but a water bath creates a more even, creamy texture and helps prevent cracks. If you skip it, bake at a slightly lower temperature (325°F) and keep an eye on the center.
Can I use boxed red velvet cake mix for the base?
You can, though the texture will be slightly different — lighter and more spongy. Use just enough batter to make a thin layer, and bake according to package instructions.
How do I know when the cheesecake is done?
The edges should be set, and the center should still have a slight wobble. It will firm up as it cools and chills.
Can I make this without strawberries?
Absolutely. You can top it with chocolate ganache, raspberries, or even leave it plain with a dusting of powdered sugar.
How do I get clean slices?
Use a sharp knife dipped in hot water and wiped clean between each cut. This gives professional-looking slices.
Conclusion
This Red Velvet Strawberry Cheesecake is a dessert that looks as good as it tastes. The vibrant layers, creamy filling, and fresh topping make it a showpiece for any celebration — but it’s also simple enough to make at home with a bit of planning.
Every slice tells a story: tender red velvet, smooth cheesecake, and juicy strawberries, working together in perfect balance. Once you make it, don’t be surprised if friends and family start requesting it for every special occasion.