Follow Me On Social Media!

Honey Garlic Chicken: The Sticky, Sweet Weeknight Dinner That Never Gets Old.
Some recipes become family staples because they’re fancy or complicated. Others earn their spot on regular rotation because they’re exactly the opposite—simple, reliable, and guaranteed to make everyone happy. This honey garlic chicken falls squarely into the second category, and it’s been saving my weeknight dinners for years.
The beauty of honey garlic chicken lies in how it transforms basic pantry ingredients into something that tastes like you spent hours in the kitchen. The combination of sweet honey and savory garlic creates a glaze that caramelizes beautifully, coating tender chicken pieces in a sticky sauce that’s both comforting and sophisticated. It’s the kind of dish that works equally well for a Tuesday night family dinner or when you’re trying to impress someone without breaking a sweat.
I discovered this recipe during one of those particularly hectic weeks when I needed something that would cook quickly, use ingredients I already had, and actually taste good enough to look forward to eating. After testing different ratios of honey to garlic and experimenting with cooking methods, I landed on this version that delivers maximum flavor with minimal fuss.
What sets this honey garlic chicken apart from others is the technique of building the sauce right in the same pan where you cook the chicken. This means every bit of caramelized flavor from the chicken gets incorporated into the glaze, creating layers of taste that you can’t achieve by simply mixing sauce ingredients in a bowl. The result is restaurant-quality flavor that comes together in about 25 minutes from start to finish.
Ingredients
For the Chicken:
- 1.5 pounds boneless, skinless chicken thighs, cut into bite-sized pieces
- 2 tablespoons olive oil or vegetable oil
- 1 teaspoon salt
- 1/2 teaspoon black pepper
- 2 tablespoons cornstarch
For the Honey Garlic Sauce:
- 1/3 cup honey
- 1/4 cup low-sodium soy sauce
- 6 cloves garlic, minced
- 2 tablespoons rice vinegar or apple cider vinegar
- 1 tablespoon cornstarch
- 2 tablespoons water
- 1/4 teaspoon red pepper flakes (optional)
- 2 green onions, sliced thin (for garnish)
- 1 tablespoon sesame seeds (optional, for garnish)
Optional Additions:
- 1 tablespoon fresh ginger, minced
- 1 bell pepper, cut into strips
- 1 cup broccoli florets
- 1/4 cup cashews or peanuts
Instructions
Start by preparing your chicken, which is the foundation for this entire dish. Cut the chicken thighs into uniform, bite-sized pieces—about 1-inch chunks work perfectly. Chicken thighs are ideal for this recipe because they stay tender and juicy even with the quick cooking method, unlike chicken breasts which can become dry.
Pat the chicken pieces completely dry with paper towels, then season them generously with salt and pepper. Toss with 2 tablespoons of cornstarch until each piece is lightly coated. This cornstarch coating serves two important purposes: it helps the chicken develop a golden, slightly crispy exterior, and it will thicken the sauce later as everything cooks together.
Heat the oil in a large skillet or wok over medium-high heat until it shimmers but doesn’t smoke. Add the chicken pieces in a single layer, making sure not to overcrowd the pan. If necessary, cook in two batches rather than cramming everything together—overcrowding will cause the chicken to steam instead of developing that nice golden color.
Cook the chicken without moving it for about 3-4 minutes, until the bottom sides are golden brown. Then flip the pieces and cook for another 3-4 minutes until the other side is golden and the chicken is cooked through. The internal temperature should reach 165°F. Transfer the cooked chicken to a plate and set aside, but don’t wipe out the pan—those golden bits stuck to the bottom are pure flavor.
While the chicken cooks, prepare the sauce mixture. In a small bowl, whisk together the honey, soy sauce, minced garlic, and vinegar until well combined. In a separate small bowl, mix the cornstarch and water to create a slurry—this will thicken the sauce to that perfect sticky consistency.
Reduce the heat under your skillet to medium and add the honey-soy mixture to the same pan you used for the chicken. The sauce will bubble and sizzle as it hits the hot pan, and you’ll immediately smell that amazing combination of caramelizing honey and toasted garlic. Stir constantly for about 1-2 minutes, scraping up any browned bits from the bottom of the pan.
Add the cornstarch slurry to the bubbling sauce, stirring continuously. The sauce will thicken almost immediately, transforming from a thin liquid to a glossy glaze within 30 seconds. If you’re using red pepper flakes, add them now for a subtle heat that complements the sweetness.
Return the cooked chicken to the skillet and toss everything together until each piece is completely coated in the sticky glaze. Cook for another 1-2 minutes, stirring frequently, until the sauce clings to the chicken and has reached your desired consistency. If the sauce becomes too thick, add a tablespoon of water. If it’s too thin, let it cook for another minute to reduce further.
Flavor & Texture Notes
This honey garlic chicken delivers exactly what you’d expect from the name—a perfect balance of sweet and savory that hits all the right notes. The honey provides natural sweetness that caramelizes during cooking, creating complex flavors that go far beyond simple sugar. The garlic mellows as it cooks, becoming fragrant and nutty rather than sharp or overwhelming.
The soy sauce adds umami depth and a subtle saltiness that prevents the dish from being cloying, while the vinegar provides just enough acidity to brighten everything up and cut through the richness. The result is a sauce that’s sweet but not dessert-like, with layers of flavor that keep each bite interesting.
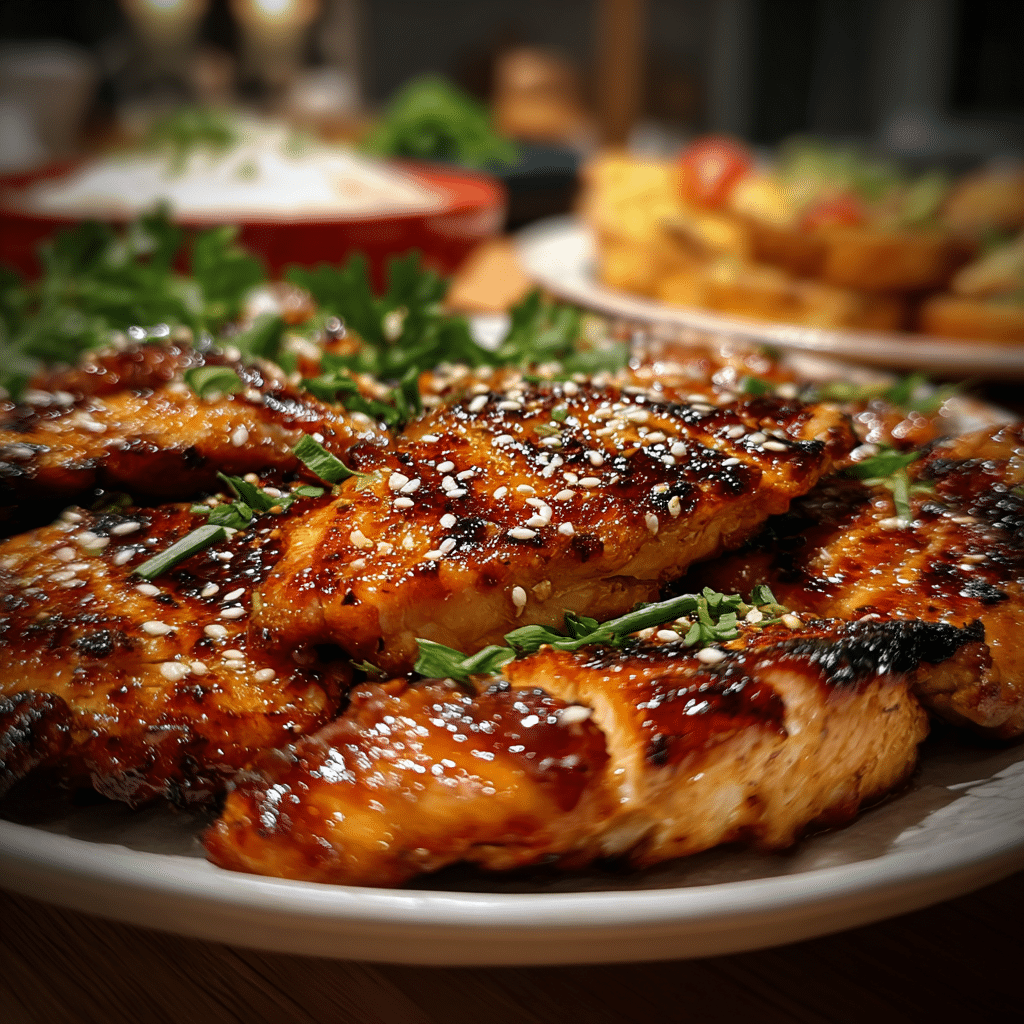
The chicken itself develops a beautiful golden-brown exterior that’s slightly caramelized from the honey glaze, while staying incredibly tender and juicy inside. The cornstarch coating creates just enough texture to make each bite satisfying without being heavy or greasy.
The final glaze clings to every surface of the chicken, creating that signature sticky texture that makes you want to lick the spoon. It’s glossy and rich-looking, with a consistency that’s thick enough to coat the chicken completely but not so thick that it becomes gummy or overwhelming.
Tips & Variations
Protein Swaps: While chicken thighs work best for their tenderness, you can substitute boneless chicken breasts cut into strips, pork tenderloin, or even firm tofu for a vegetarian version. Chicken breasts cook faster, so reduce the cooking time to prevent them from drying out. For tofu, press it well and use extra-firm variety.
Vegetable Additions: Turn this into a complete one-pan meal by adding vegetables during the last few minutes of cooking. Bell peppers, broccoli, snap peas, or carrots all work beautifully. Add them after you return the chicken to the pan so they stay crisp-tender.
Heat Level: Control the spice by adjusting or omitting the red pepper flakes. For more heat, try adding fresh sliced jalapeños with the garlic, or finish with a drizzle of sriracha or chili oil.
Sauce Variations: For a more complex flavor, add 1 tablespoon of minced fresh ginger with the garlic, or substitute maple syrup for half the honey. A splash of sesame oil at the very end adds nutty depth that pairs beautifully with the other Asian-inspired flavors.
Make It Healthier: Reduce the honey to 1/4 cup for a less sweet version, or substitute with sugar-free honey alternative. You can also use coconut aminos instead of soy sauce for a gluten-free, lower-sodium option.
Nuts and Crunch: Add toasted cashews, peanuts, or sliced almonds during the last minute of cooking for extra texture and richness. Sesame seeds make a beautiful garnish that adds visual appeal and subtle nutty flavor.
Storage & Make-Ahead
This honey garlic chicken is best enjoyed fresh when the glaze is at its stickiest and the chicken is at its most tender. However, leftovers store well in the refrigerator for up to 3 days in an airtight container. The sauce may thicken as it cools, but it will loosen up again when reheated.
When reheating, add a splash of water or chicken broth to the pan to help restore the sauce consistency. Heat over medium-low heat, stirring gently, until warmed through. Avoid high heat, which can cause the sauce to burn or the chicken to become tough.
For meal prep, you can cut and season the chicken up to a day in advance, storing it covered in the refrigerator. The sauce ingredients can also be mixed together ahead of time, though the cornstarch slurry should be made fresh to prevent separation.
This dish doesn’t freeze particularly well due to the cornstarch-thickened sauce, which can become grainy when thawed. If you do freeze leftovers, use them within a month and be prepared for some texture changes in the sauce.
Serving Suggestions
Honey garlic chicken pairs beautifully with steamed rice, which soaks up all that gorgeous sticky sauce. Jasmine rice or brown rice both work well, providing a neutral base that lets the chicken flavors shine. For a lower-carb option, serve over cauliflower rice or zucchini noodles.
The sweet-savory flavors complement simple vegetables like steamed broccoli, green beans, or bok choy. A crisp cucumber salad with rice vinegar dressing provides a refreshing contrast to the rich, sticky chicken.
For a complete meal, try serving this over a bed of mixed greens—the warm chicken and sauce will slightly wilt the lettuce while the fresh greens provide a nice textural contrast. Add some sliced avocado and cucumber for extra freshness.
This dish looks beautiful garnished with sliced green onions and a sprinkle of sesame seeds. The green onions add a mild, fresh bite that cuts through the richness, while sesame seeds provide visual appeal and subtle nutty flavor.
FAQ
Can I use chicken breasts instead of thighs? Yes, but chicken thighs are preferred because they stay more tender and juicy. If using breasts, cut them into strips rather than chunks, and reduce the cooking time to 2-3 minutes per side. Watch carefully to avoid overcooking, as breasts can become dry quickly.
My sauce is too thick/thin. How do I fix it? If the sauce is too thick, add warm water or chicken broth one tablespoon at a time until you reach the desired consistency. If it’s too thin, let it simmer for another minute or two to reduce, or mix a small amount of cornstarch with water and stir it in.
Can I make this gluten-free? Absolutely. Use tamari or coconut aminos instead of soy sauce, and make sure your cornstarch is certified gluten-free. All other ingredients are naturally gluten-free, so these simple swaps will make the entire dish safe for those avoiding gluten.
How do I prevent the garlic from burning? Keep the heat at medium when making the sauce, and stir constantly once you add the honey-soy mixture. The honey will caramelize quickly, which can cause the garlic to burn if the heat is too high. If you notice the garlic browning too fast, reduce the heat immediately.
Can I double this recipe for a crowd? Yes, but you may need to cook the chicken in batches to avoid overcrowding the pan. Use two large skillets if you have them, or cook the chicken in batches and combine everything at the end when adding the sauce. The sauce recipe doubles perfectly without any adjustments needed.
What’s the best way to cut the chicken for even cooking? Cut the chicken thighs into uniform pieces about 1-inch in size. Remove any excess fat or gristle, but don’t trim away all the fat—it adds flavor and keeps the meat moist. Try to make all pieces roughly the same size so they cook at the same rate.
Sometimes the best recipes are the ones that don’t try to be too clever or complicated. This honey garlic chicken proves that simple combinations of quality ingredients, prepared with care, can create something truly satisfying. It’s become one of those reliable dishes that I know I can count on when I need dinner to be both easy and good—the kind of recipe that builds confidence in the kitchen and happiness around the dinner table. Give it a try on your next busy weeknight, and don’t be surprised when it becomes a regular request in your household.